Senin, 29 Oktober 2012

Chicken Pot Pie Crumble - My Favorite Pot Pie


You are looking at a must try comfort food meal. I was never a fan of chicken pot pie until a friend so kindly brought me this dish after I had my baby a few years ago. I'm fully in love with it! Rather then getting a surrounding of heavy pie crust you get a fluffy biscuit topping that will quickly have you loading your plate with a second round. In my opinion the topping is what makes this dish. It sets it apart from it's competitors, being loaded with Parmesan cheese, plenty of heavy cream, some black pepper and cayenne pepper for a slight kick, and I also added a little garlic powder (because how can I resist?). Then to finish, it's browned in the oven to beautifully golden perfection. 
And the wonder doesn't just end at the topping. That is just the beginning. It's loaded with fresh, sauteed veggies, fall apart tender chicken which is all tossed in a creamy white sauce. This hearty dish would also be incredible made with leftover turkey from your upcoming Thanksgiving feast. 
I love how this is your entire meal in one dish. The main course with the chicken, the side with its generous portion of veggies and a bread with that unbelievable topping. I love how the slightly tangy flavor from the Parmesan cheese will keep people wondering what delicious ingredient that incredible flavor is coming from. 
This meal will remind you of what a classic, simple, just plain good meal is intended to be. Enjoy!


Chicken Pot Pie Crumble
Yields about 5 - 6 servings

Ingredients:
20 oz. boneless skinless chicken breast halves (about 2 large)
1 (14.5 oz) can low-sodium chicken broth
1 Tbsp olive oil
1 cup peeled and diced carrots (about 2 large carrots)
3/4 cup diced celery (about 2 large stalks)
3/4 cup finely diced yellow onion (about 1/2 medium onion)
2/3 cup frozen peas
3 Tbsp butter
1/3 cup all-purpose flour
3/4 cup milk
1 tsp lemon juice
1 1/2 tsp dried parsley
1/4 tsp dried thyme

For the crumble:
1 1/2 cups all-purpose flour
1 1/2 tsp baking powder
1/2 tsp salt
1/4 tsp freshly ground black pepper
1/4 tsp garlic powder (use 1/2 tsp for a slightly stronger garlic flavor)
1/8 tsp cayenne pepper (optional)
1/4 cup butter, cold and diced into small cubes
2 oz. finely shredded Parmesan cheese (about 1/2 cup packed)
3/4 cup + 2 Tbsp heavy cream

Directions:
Place chicken in a slow cooker, pour chicken broth over chicken. Cover with lid and cook on low heat about 5 - 6 hours until chicken is cooked through. Remove chicken from slow cooker, dice and set aside. Strain broth from slow cooker through a fine mesh strainer into a bowl and reserve broth (if you don't have a fine mesh strainer just try to remove the pieces of fat). 
To prepare crumble: Preheat oven to 450 degree. In a mixing bowl, whisk together flour, baking powder, salt, pepper, garlic powder and optional cayenne pepper. Using your finger tips, cut butter into mixture until mixture resembles coarse crumbs. Stir in Parmesan cheese. Pour in heavy cream and mix just until combine. Break and drop mixture into 1 - 2-inch pieces onto a Silpat lined baking dish. Bake in preheated oven for 10 minutes until golden. Remove from oven and set aside.
To prepare filling: Heat olive oil over medium high heat. Once hot, add diced carrots, onion and celery. Saute vegetables, stirring occasionally until lightly golden and tender, about 5 - 6 minutes. Pour vegetables into a bowl and set aside. Reduce heat to medium, melt butter in saucepan (I like to brown it a bit for and extra layer of flavor), then add in flour and cook, stirring constantly for about 20 seconds (it will be very thick). While stirring, slowly add in milk followed by reserved chicken broth, lemon juice, parsley, thyme and season with salt and pepper to taste. Bring mixture just to a boil,  then slightly reduce heat and allow to cook about 1 minute longer until thickened, stirring constantly. Remove sauce from heat and add sauteed vegetables, frozen peas and diced chicken to sauce, then toss to evenly coat. Pour mixture into a 9-inch pie dish and sprinkle with baked crumble topping (mine fit perfectly in my pie dish but if yours is coming close to the top edge you may want to sit it on top of a cookie sheet to prevent spills in your oven). Bake in 400 degree oven until nicely golden about 12 - 14 minutes. Serve warm.

Recipe Source: adapted slightly from Cook's Illustrated, and yes I omitted the tomato paste and soy sauce =)

Jumat, 26 Oktober 2012

Cannoli Cupcakes


All the deliciousness of a cannoli without the frying mess!? Yes indeed. These cupcakes are complete and utter bliss! I have a total weakness for cannolis so I was so excited to see they come in cupcake form. I love all things pastry and all things cupcake and these are the best of both worlds combined into one decadent, out of this world dessert. These are deliciously indulgent and perfectly dainty. They are fancy enough that I felt it was an occasion worth getting out my Grandmother's fine china set, sipping milk out of a tea cup and gently using a fork as if I were a Queen. That is until after one bite, I quickly forgot that fancy mannered moment and rather wanted to drop my fork and shove the entire cupcake in mouth and devour all of it in it's entirety without leaving a smidgen of a crumb behind. And then steal everyone else's. Yes just that good. These are one of the best cupcakes I've ever had and they will definitely be going on my list of favorite cupcakes that I will make time and time again. I think I'm going to want this in layered cake form for my birthday garnished with a few of the real thing.
If you haven't tried Mascarpone cheese (which makes up half the cannoli filling for the cupcake) then you must! It is the most heavenly cheese made. The texture and taste are somewhat similar to cream cheese yet so much better. It's fluffy and soft, with a light buttery sweetness to it. I could eat it by the spoonful. It's an Italian cheese so you will likely find it in the specialty cheese section of many grocery stores. The cost is about twice that of cream cheese but sometimes a little splurge is definitely worth it. Enjoy!  


Then one up close and personal pic. 
Wanna bite? I know I do.

Cannoli Cupcakes
Yields 1 dozen

Ingredients:
1 1/2 cups all-purpose flour
1 1/2 tsp baking powder
1/4 tsp salt
1 cup granulated sugar
1/2 cup salted butter, at room temperature
2 large eggs
1 1/2 tsp vanilla extract
1/2 cup sour cream

2/3 cup Mascarpone cheese
2/3 cup Ricotta cheese, strained slightly*
5 Tbsp powdered sugar

1 1/2 cups heavy cream
1/2 cup powdered sugar
2 Tbsp cocoa powder
1/2 tsp vanilla extract

3 Tbsp mini semi-sweet chocolate chips, for garnish

Directions:
For the cupcake ~ Preheat oven to 350 degrees. In a mixing bowl, whisk together flour, baking powder and salt, set aside. In the bowl of an electric stand mixer fitted with the paddle attachment, whip together butter and sugar on medium high speed until pale and fluffy, about 3 - 4 minutes, occasionally scrapping down the sides of the bowl. Stir in eggs one at a time mixing until combine after each addition. Mix in sour cream and vanilla. With mixer set at low speed, slowly add dry ingredients and mix just until combine, scraping down sides and bottom of bowl as needed. Divide batter among 12 paper lined muffin cups, filling each cup about 2/3 full (about 1/4 cup batter per each). Bake in preheated oven 21 - 24 minutes until lightly golden and toothpick inserted into center of cupcake comes out clean. Allow to cool several minutes before transferring to wire rack to cool. Cool cupcakes completely.

For the cannoli filling ~ In a small mixing bowl, using a rubber or silicone spatula, blend together Mascarpone and Ricotta cheese while running and pressing mixture along bottom of bowl to create a smooth texture while removing any lumps. Add in 5 Tbsp powdered sugar and mix until well blended.

For sweetened chocolate whipped cream ~ In a mixing bowl, using an electric hand mixer set on low speed, blend together heavy cream, 1/2 cup powdered sugar, cocoa and vanilla until combine. Increase mixer to medium-high speed and whip until stiff peaks form. 

To assemble cupcakes ~ Spread about 1 1/2 Tbsp cannoli filling over the top of each cupcake, then pipe sweetened chocolate whipped cream over cupcakes. Garnish with mini chocolate chips. Serve within the next 3 hours (as the whipped cream will begin to break down after that). Store in refrigerator in an airtight container.

*Measurement taken before straining. To strain, I just placed the ricotta onto a layer of clean paper towels then wrapped it up and squeezed to strain out the liquids, then did this same step once more with a new batch of paper towels. You don't need all of the liquid removed just some of it. I used part skim Ricotta but whole milk Ricotta works too.

Recipe Source: adapted slightly from Tide and Thyme who adapted it from Fabulicious! by Teresa Giudice

Kamis, 25 Oktober 2012

Glazed Doughnut Muffins


Mmmmm doughnuts. Who doesn't love them? I love that this version comes in muffin form and tastes just like cake doughnuts without being fried! Therefore they are easier, healthier, with less frying mess to clean up and they taste just as good as the real thing. I saw this recipe over on Fine Cooking and knew I had to try it. After reading through the reviews I made a few adaptations of my own to add flavor, increase muffin height, slightly change texture and opted to go for a doughnut glaze rather than a buttered cinnamon sugar coating. 
Now the only problem I have is that I want to eat them for breakfast, brunch, lunch, linner and dinner. I'm excited to try other variations of this muffin in the future (like orange cranberry, lemon poppy seed, dulce de leche, blueberry or jam filled, chocolate or pumpkin). Endless and delightfully delicious possibilities. Enjoy!


Glazed Doughnut Muffins
Yields 1 dozen

Ingredients:
3 cups all-purpose flour
2 1/2 tsp baking powder
1/4 tsp baking soda
3/4 tsp salt
1 1/4 tsp ground cinnamon
1/2 tsp ground nutmeg
3/4 cup milk
1/4 cup + 2 Tbsp buttermilk
10 Tbsp butter, softened
1 cup granulated sugar
2 large eggs
1 tsp vanilla extract

Glaze:
1 1/2 cups powdered sugar
3 Tbsp milk
1/2 tsp vanilla extract

Directions:
Preheat oven to 400 degrees. In a mixing bowl, whisk together flour, baking powder, baking soda, salt, cinnamon and nutmeg, set aside. In a separate bowl, whisk together milk and buttermilk, set aside.
In a large mixing bowl, using and electric hand mixer on medium speed, blend together butter and sugar until well combine, about 30 seconds. Mix in eggs one at a time mixing after each addiction. Blend in vanilla. Using a wooden spoon to mix, add flour mixture in three separate batches, alternating with two additions of the milk mixture, mixing just until combine after each addition (batter will be thick). Divide batter among 12 paper lined muffin cups (in a non-stick muffin tin) filling each one nearly full (about 1/3 cup batter per each). Bake in preheated oven 15 - 20 minutes until toothpick inserted into center of cupcake comes out clean. Transfer to a wire rack and allow to cool for about 10 minutes. 
During the last few minutes of cooling prepare glaze by whisking together powdered sugar, milk and vanilla in a small bowl. Dip each muffin in glaze, while twirling and rotating to evenly coat tops (and allowing it a few seconds to get a good layer of coating on), then lift and allow excess glaze to run off. Enjoy warm or allow cupcakes to rest at room temperature about 5- 10 minutes until glaze has set. Store in an airtight container.

*recipe updated 10/25/12, I made these a second time around today and omitted the lemon juice and used real buttermilk instead. If you don't have buttermilk, simply add just over a tsp of lemon juice to 1 cup + 2 Tbsp milk.

Recipe Source: adapted lightly from Fine Cooking

Senin, 22 Oktober 2012

Caprese Lasagna Roll Ups


Aww, just look at all the gooey, soon to be stretched and strung (upon my no longer empty fork) cheese and dream of what could be yours =)! Italian comfort food at its finest.
The saying third times a charm, it's true. Yes this is my third attempt at creating what I'd envisioned, and at last a beautifully delicious success. 
The first time I tried Chicken Caprese lasagna roll ups - strange texture and not my favorite flavor, the second time around I omitted the chicken and made them using fresh Mozzarella - far to soupy and (I was expecting some liquid but I'm telling you half the baking dish was filled with the liquid from the fresh Mozza). The texture of the fresh Mozzarella seemed a little gummy when it melted too. So, the third time I went with a more traditional cheese feeling with the average low-moisture part skim Mozzarella cheese and lots of it, a bit of Parmesan for flavor and a little Ricotta for texture and glueage (I know that's not a word, but I say it should be). The egg white also helps glue and bind the mixture together, I decided to omit the yolk because I wanted to keep my cheese filling nice and white so it has that Caprese-y look. Besides, omitting the egg yolk is my attempt at making them healthier. That's laughable I know. I say cheese = calcium, so this is somehow good for me =). 
This dish has everything you find in the traditional Caprese flavors and many of the traditional lasagna flavors. Really this is lasagna simplified both in flavor and preparation. With that I don't mean to say their flavor is bland and boring, they are just simple yet incredible flavors. To create the Caprese style filling, you begin with a cheese filling that's mostly Mozzarella, then it's layered with fresh Roma tomato slices and sprinkled with fresh basil. Then you roll it up and top it with a simple marinara sauce made from crushed Roma tomatoes, and you sprinkle over more Mozzarella cheese, bake it and then garnish it with fresh basil ribbons. So, they are Caprese inside and out. I love the fresh flavors of this entree and all that heavenly cheese of course! Who knew vegetarian could be so good? Enjoy!


This is how the layering should look, this was attempt 2 with fresh Mozzarella (which I highly don't recommend). I just didn't want to take a third round of pictures of the prep, so the only difference when you make them will be the use of shredded mozzarella rather than the fresh Mozzarella in the bottom layer. The top picture was end result of recipe listed.


Caprese Lasagna Roll Ups
Yields 8 servings

Ingredients:
8 lasagna noodles, uncooked
14 oz freshly shredded, low-moisture part skim Mozzarella cheese, divided
3/4 cup Ricotta cheese
1 large egg white
1/3 cup freshly, finely shredded Parmesan cheese (about 1 1/4 oz)
freshly ground black pepper
3 - 4 medium Roma tomatoes, thinly sliced (about 1/6 inch thick slices)
1/4 cup chopped fresh basil, plus more for garnish
1 cup Simple Marinara Sauce, recipe follows 

Directions:
Preheat oven to 350 degrees. Cook pasta according to directions listed on package to al dente. Drain pasta (DO  NOT rinse with water) and align lasagna noodles in a single layer on a large sheet of parchment or wax paper.
For filling, in a large mixing bowl, whisk together ricotta cheese and egg white until well blended. Stir in Parmesan cheese. Mix in 12 oz. of the Mozzarella cheese and season with black pepper to taste (I wouldn't recommend seasoning with salt just because the cheeses already have plenty of salt). 
Place 1/4 cup of the cheese mixture over each lasagna noodle and spread into an even layer, going from one end of the lasagna to the other. Align 4 thin tomato slices over cheese mixture then sprinkle fresh basil over top. Snugly roll lasagna noodles to opposite end. Spread about 1/4 cup pasta sauce in the bottom of an 11 x 7 inch baking dish. Align lasagna roll ups, seam side down in dish. Top each roll up with about 2 Tbsp of the pasta sauce (covering edges of pasta so they don't dry out while baking). Sprinkle top with remaining 2 oz. shredded Mozzarella. Bake in preheated oven 30 minutes. Remove from oven, plate pasta and garnish with plenty of basil ribbons. Serve warm.


Simple Marinara Sauce
2 Tbsp extra virgin olive oil
1/4 cup finely chopped yellow onion
2 cloves garlic finely minced
1 (28 oz) can crushed tomatoes
salt and freshly ground black pepper to taste


Directions:
Heat olive oil in a medium saucepan over medium high heat. Add onions to hot oil and saute about 3 minutes until soft, adding garlic during last minute of sauteing. Pour in crushed tomatoes and season with salt and pepper to taste. Bring mixture just to a boil, then reduce heat to a simmer and allow sauce to cook for about 25 - 30 minutes (which will allow some of the water in crushed tomatoes to evaporate) while you prepare pasta and lasagna filling (you can freeze or refrigerate left over sauce in a small airtight container for later use, adding fresh basil if desired).

Recipe Source: Cooking Classy

Sabtu, 20 Oktober 2012

Pasta with Browned Butter and Mizithra (Must Try 15 Minute Meal!)


Who doesn't love a quick and simple meal that wows? This Pasta with Browned Butter and Mizithra cheese can be made in 15 minutes, yes 15 minutes, and its a recipe you are going to want to keep for life. 
In my opinion one of the best entrees you can get at the Old Spaghetti Factory is their Spaghetti with Mizithra and Browned Butter. It is simply amazing! But, why go there and spend $11 for one when you can feed a family of 4 the same meal for less than that at home? It's funny to me posting such a simple recipe because it's so simple you don't need a recipe for it, this is more sharing the idea if you haven't yet tried it. 
Another great thing about this meal is that it pleases everyone, from the gourmet sleuth to your pickiest eater. No one can deny the delicious flavors of this pasta. And "Mizithra," isn't it just fun to say?
You can serve this garnished with chopped fresh parsley like they do at The Old Spaghetti Factory but I really don't think it needs it, it's more for looks. I would also say no salt is needed because the Mizithra brings enough salt to the dish. You could add in more fillers like roasted garlic, sauteed bread crumbs, fresh lemon juice/zest or fresh basil but really this meal is perfect with it's three simple ingredients. You can find Mizithra cheese in the specialty cheese section of most grocery stores (which is usually near the produce section) or at Greek specialty stores. This is comfort food at it's simplest and best. Some days you just need some delicious carbs. Enjoy!


Pasta with Browned Butter and Mizithra
Yields about 3 - 4 servings, recipe can easily be doubled

Ingredients:
8 oz. spaghetti or fettuccine pasta 
1/2 cup salted butter, sliced into pieces
3 oz finely grated Mizithra cheese, or to taste

Directions:
Cook pasta according to directions listed on package (I'd recommend beginning with very hot tap water to boil the pasta as this will cut the time you have to wait for the water to boil). Meanwhile, place butter in a light-colored, small saucepan over medium heat. Cook butter, swirling pan occasionally, until it has browned (begin with sliced butter to ensure even melting. Here are the stages of to browning butter: the butter will first melt, it will become lemony yellow and after a minute or two it will begin to splatter a bit - I swirl the pan most during this stage to reduce splattering, then it will foam and begin to smell nutty, then little brown specks will begin to appear in the center of the golden foamy bubbles - this is when you remove it from heat, I wait just a few seconds for a generous amount of specs maybe a 2-inch circle before removing from heat. Color wise it should go from a yellow, to golden tan, to an orange-y toasty golden brown). 
Drain cooked pasta well (DO NOT rinse the pasta with water or the butter won't stick). Plate pasta, pour browned butter over pasta (sediments on bottom and all), sprinkle with Mizithra cheese and toss if desired to evenly coat. Serve immediately, you can also serve it with fresh cracked black pepper and chopped fresh parsley if desired (I don't think any salt is needed because the Mizithra is a pretty salty cheese).

Recipe Source: Cooking Classy, inspired by The Old Spaghetti Factory

Jumat, 19 Oktober 2012

Homemade Tortillas - White and Whole Wheat Recipes


If you ask me, made from scratch Mexican food is just about as good as it gets. I've mentioned before that Mexican and Italian food are my two favorite kinds of food. One thing I love about each of them (other than the number one reason - the incredibly delicious flavors) is their use of so many fresh ingredients and how a lot of it is made from scratch. I've been to Mexico just a few times and one of my favorite things there was always the fresh tortillas. I loved stopping by the market to get a bag filled with a large stack of fresh flour tortillas from the bakery (I loved the fresh churros they have too, mmmm). I could probably eat that whole stack in one sitting.
These may seem like one of those things that's not worth the time and effort but I'm telling you, it is! I just don't like the flour tortillas from the store that are pre-made and loaded with preservatives, they just taste weird to me. Once you've had fresh tortillas, you know what I mean when I say homemade and store-bought aren't the same thing at all. There is the uncooked version you can get in the refrigerated section of the grocery store (which is what I use when I don't have time to make them from scratch) which are undoubtedly so much better than those you get on the shelf. Then several steps up from those are the homemade version.
These tortillas are a definite highlight of a Mexican meal. They are a simple, yet incredible upgrade. The tortilla is the first thing your going to bite into after all, so it better be good right? Enjoy!

Homemade Tortillas
Yields about 8 10-inch tortillas (you can get more then this just roll them 6 or 7-inches for taco size shells)

Ingredients:
3 cups all-purpose flour

1 1/2 tsp salt
1 tsp baking powder
1/3 cup shortening or lard (or a combo of both)
1 - 1 1/4 cups very warm water
You'll also need large Ziploc bag

Directions:
In a large mixing bowl, whisk together flour, salt and baking powder. Using your hands, rub the shortening into the flour mixture until evenly distributed (mixture should hold its shape when clamped between your hands). Pour in 1 cup water and use a wooden spoon to stir until mixture comes together, adding additional water as needed (I used 1 cup + 2 Tbsp water). Knead mixture by hand until smooth (I just did this in the bowl). Divide mixture into 8 equal portions and shape each portion into a ball. Cover dough balls with plastic wrap and let rest at least 30 minutes and up to 1 hour. 
Roll each ball out on a lightly floured surface into a 10-inch circle (for a nice circular form flatten ball slightly then roll in one direction, make a  1/6 turn roll again, make another 1/6 turn and roll again. Continue to roll and turn until your dough circle is about 10-inches across). 
Heat a large non-stick skillet over medium high heat. Place rolled tortilla in hot skillet and cook until bubbles begin to appear on the surface, then flip tortilla to opposite side and cook until golden brown spots begin to appear on bottom. Immediately transfer cooked tortilla to a large Ziploc bag and seal bag (or tuck the opening underneath that way you wont keep on zipping and unzipping the bag as you work). Repeat process with remaining tortillas. Tortillas can be stored in an airtight container at room temperature for about 2 days or in refrigerator up to 1 week.

Homemade Wheat Tortillas
Yields about 10 10-inch tortillas

Ingredients:
3 cups whole wheat flour (or 2 cups wheat flour + 1 cup all-purpose)
1 1/2 tsp salt
1 tsp baking powder
3 Tbsp shortening
3 Tbsp canola, vegetable or olive oil
2 tsp sesame seeds, optional
1 1/4 - 1 1/2 cups very hot water
You'll also need a large Ziploc bag

Directions:
In a large mixing bowl whisk together flour, salt and baking powder. Using your hands, rub shortening into flour mixture until evenly distributed, about 1 minute. Add in canola oil and mix with your hands until evenly distributed. Mix in optional sesame seeds. Pour 1 1/4 cups hot water into mixture and mix with a wooden spoon until mixture starts to come together, adding additional water as needed, then knead by hand until smooth.
Divide dough into 10 equal portions and shape each portion into a ball. Cover with plastic wrap and let rest at least 30 minutes or up to 1 hour.

Roll each ball out on a lightly floured surface into a 10-inch circle (for a nice circular form flatten ball slightly then roll in one direction, make a  1/6 turn roll again, make another 1/6 turn and roll again. Continue to roll and turn until your dough circle is about 10-inches across). 
Heat a large non-stick skillet over medium high heat. Place rolled tortilla in hot skillet and cook until bubbles begin to appear on the surface, then flip tortilla to opposite side and cook until golden brown spots begin to appear on bottom. Immediately transfer cooked tortilla to a large Ziploc bag and seal bag (or tuck the opening underneath that way you wont keep on zipping and unzipping the bag as you work then seal it shut when finished). Repeat process with remaining tortillas. Tortillas can be stored in an airtight container at room temperature for about 2 days or refrigerated up to 1 week.


Recipe Source: white tortilla recipe adapted lightly from whatcookingamerica.net

Rabu, 17 Oktober 2012

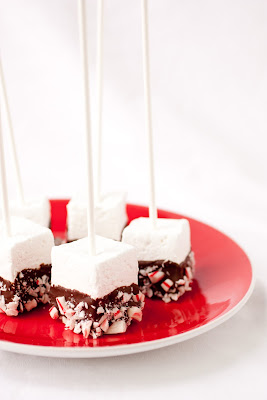
Homemade Peppermint Marshmallows - The Perfect Hot Cocoa Stirrers


I know I know, you're thinking Christmas already!? Well, these aren't just a Christmas treat. Yes they do make a wonderful and festive Christmas treat but to me these are the best upgrade hot cocoa has ever been given, and hot cocoa isn't just for Christmas. 
Words nearly cannot express the complete and utter bliss I experienced when dipping one of these chocolate and peppermint candy coated homemade peppermint marshmallows into a cup of hot cocoa. And I used to think dunking Twix candy bars in hot cocoa was good. It's like winter S'mores somehow. As you dunk and swirl the marshmallow the chocolate coating becomes warm and turns to the most incredible melt-y goodness, and the peppermint candy softens a bit while it's flavors prepare you for the dreaminess ahead, then the best part - the marshmallow will melt and puff a little as it becomes creamy and inexplicable delicious. Heaven on a stick. I want the whole batch of chocolate covered homemade marshmallows to myself but somehow I must learn to share because these are too good not to share. I thought of calling these Peppermint Hot Cocoa Stirrers because I think hot cocoa dipping is definitely their best use, but you can call them what ever you'd like.
This was only my second time making homemade marshmallows (don't ask me why I haven't made them a million times more because they are so good) so don't worry they really are quite simple to make. The mixer does the hard part. The key is just in following directions. Alton Brown's recipe for marshmallows is the one I made a few years ago and this time around and it's probably the only one I will ever need. The only change I made was replacing the vanilla extract with peppermint extract. I hope you love these irresistible treats as much as I do! Enjoy!


Peppermint Marshmallows
Yields about 32 large marshmallows

Ingredients:
3 packages unflavored gelatin
1 cup ice cold water, divided
1 1/2 cups granulated sugar
1 cup light corn syrup
1/4 tsp salt
1/2 - 1 tsp peppermint extract, to taste*
1/4 cup powdered sugar
1/4 cup cornstarch
butter, for coating baking dish

Directions:
Place gelatin in the bowl of an electric stand mixer fitted with whisk attachment. Pour in 1/2 cup ice cold water (don't mix yet), let rest while you prepare sugar syrup.
In a small saucepan, combine remaining 1/2 cup water, granulated sugar, corn syrup and salt. Cover saucepan with lid and heat mixture over medium heat for 3 - 4 minutes. Uncover saucepan and cook mixture, without stirring, until mixture reaches exactly 240 degrees on a candy thermometer. Once mixture reaches 240 degrees immediately remove from heat. 
Turn stand mixer on low speed and with mixer running, slowly and carefully pour the hot sugar syrup down the side of the mixing bowl into the gelatin mixture. Once all the syrup has been added, increase mixer to high speed (I set mine on the 8 of the KitchenAid stand mixer) and whip mixture until it is lukewarm, very fluffy and very thick, about 12 - 15 minutes. Add the peppermint extract during the last minute of mixing. While the mixture is blending, in a small bowl whisk together powdered sugar and cornstarch then run a stick of butter along the bottom and edges of an 11 x 7 inch baking dish (making sure you coat all areas, including corners, to prevent sticking). Sprinkle a few tbsp of the powdered sugar/cornstarch mixture over the buttered baking dish and move dish back and forth to evenly coat, then shake off excess.
Coat a rubber spatula with butter, then pour whipped mixture into prepared baking dish using the coated spatula to scrape mixture out. Spread mixture into an even layer in baking dish using butter coated spatula. Sprinkle top lightly and evenly with powdered sugar mixture, reserving remaining sugar mixture. Allow marshmallows to rest uncovered at least 4 hours or up to overnight.
Turn the set marshmallows out onto a cutting board (you will likely have to run something around the edges and slightly along the bottom help the marshmallows drop) and cut marshmallows into squares using a pizza wheel dusted with powdered sugar mixture (I cut mine into 8 rows then each row into 4 because I wanted them tall for dipping but you could cut more than that if you want). Place cut marshmallows in powdered sugar mixture and turn to coat all sticky sides, dusting off excess (dust them off well if dipping/spreading with chocolate or it wont stick well). Store in an airtight container for up to 3 weeks.

*If you are making them to dip in hot cocoa I would recommend the full 1 tsp, if you are making them just to eat on their own I may go with 1/2 tsp. You can add 1/2 tsp first then taste a bit and if you want a stronger peppermint flavor add another 1/2 tsp.

Recipe Source: Marshmallow recipe adapted from Alton Brown via Food Network (non-peppermint version)

Peppermint Bark Marshmallows

Ingredients:
12 oz. chopped chocolate, semi-sweet chocolate chips or almond bark
3/4 cup crushed candy canes
1 recipe peppermint marshmallows, above (store bought marshmallows would work fine too)
lollipop sticks or straws 

Directions:
Spread a sheet of wax or parchment paper on counter (this is where dipped marshmallows will set). Melt chocolate in microwave on 50% power in 30 second intervals, stirring after each interval until melted and smooth. Spread a layer of melted chocolate over bottom half of marshmallow, then dip chocolate coated portion in crushed peppermint (alternately you can dip the marshmallows in the melted chocolate, I just found spreading it on worked better for me. It seemed too thick and messy so I just used an icing spatula to spread it on instead. Almond bark may work better for dipping because it has a thinner consistency), then place coated marshmallow chocolate coated side down on wax paper. Insert a lollipop stick through the top and center of each marshmallow (if using), then let rest at room temperature until chocolate has set, about 1 hour. Store in an airtight container.


Senin, 15 Oktober 2012

My Favorite Broccoli Cheese Soup


So I woke up bright and early today to create what I thought was a genius idea, a light broccoli cheese soup. Well, lets just say it failed epicly because broccoli cheese soup is just not meant to be light. It's not the same without some butter, lots of cheese and a little cream. It lacked far too much, so I tossed it down the sink and began again - the right way. With all the goodness it's intended to have. Sometimes it's worth the calories! I went with a larger portion milk to a lesser portion of cream, so it's better for you than a mostly cream or half and half version at least =). I threw in one of my favorite herbs, a bit of thyme (I tossed a bit into my gravy yesterday too it compliments a lot of foods). Then, I couldn't stick with just one type of cheese so I had to add in some Parmesan. I may call it the secret of the soup. You could even up it to 2 oz of Parmesan if you want a slightly more pronounced flavor. It really gives the soup a perfect little kick without being overpowering. Just be sure you use freshly grated cheeses, no pre-shredded in this recipe or the smooth texture of the soup would likely be ruined. Also, when I state in the recipe to very finely grate the Parmesan I mean on the funky looking, pokey side of the box grater. Grating it this way helps it melt quicker and smoother. 
I love that this soup is hearty without being too heavy. It's filling enough that it can be served as the main course. All you need is this and some fresh Crusty Rustic Bread (I live on the stuff lately) and you've got yourself an incredibly delicious, simple and comforting meal. This is definitely my new favorite Broccoli Cheese Soup! Enjoy!


Chop the broccoli into small pieces and finely grate the Parmesan (the Cheddar can be grated on the large or small grate, it will melt quickly either way).

Broccoli Cheese Soup
Yields about 4 - 6 servings

Ingredients:
1/3 cup butter, diced in cubes
1 cup diced yellow onion (about 1/2 large onion)
1 large clove garlic, finely minced
1/4 tsp dried thyme
1/3 cup all-purpose flour
3 cups milk (I used 2%)
2 cups chicken broth
1/2 cup heavy cream
3 cups finely chopped, fresh broccoli pieces*
6 oz. freshly grated Sharp Cheddar cheese
1 oz. freshly, very finely grated Parmesan cheese (or more to taste)
salt and freshly ground black pepper to taste (I used about 1/2 tsp of each, but this will vary depending on the brand of cheeses and your salt/pepper preference).

Directions:
Melt butter in medium saucepan over medium high heat. Add in onions and cook, stirring frequently until soft, about 3 minutes. Add in garlic, dried thyme and flour, and cook for about 1 minute, stirring constantly. While whisking, slowly pour in milk, chicken broth then cream. Cook, stirring frequently, just until mixture begins to gently bubble, then reduce heat to medium low, add in broccoli pieces and cook until broccoli is tender about 6 - 8 minutes, stirring frequetly. Turn heat off, add in cheese and stir until melted, season with salt and pepper to taste. Serve warm. 

*From about 3 heads of broccoli, use floret portion only. I began with about 1 lb broccoli crowns, chopped off majority of the stems, then chopped the florets into very small pieces about 1/4 - 1/2 inch. 

Recipe Source: Cooking Classy

Jumat, 12 Oktober 2012

Pumpkin Chocolate Chip Cookies


So maybe I'm a pumpkin addict. What a strange thing to be addicted to =). I love it! Hate it plain but love it in baked goods. Is there anyone out there that eats it plain by the spoonful? Ugh. Horrifying. That would be like eating canned beets! No no, not that bad. There's nothing worse than canned beets. I tasted a bit of plain pumpkin puree when I was making these and it tasted like a spoonful of mushy, far too healthy to be good for you, baby food. Maybe if you were to jazz it up with some sort of spices and lots of butter than maybe, just maybe. Add a little sugar in there and I'll eat it for sure. Not sure why I'm talking about that... so, onto the cookies! I love love LOVE Pumpkin Chocolate Chip Cookies. I don't know how you could not love the sweet, delicious little pillows of baked pumpkin-y goodness. 
I found this recipe over at allrecipes.com. I created my own adaptation, because really how do I stick to a recipe? I love to put my own spin on things. I used less cinnamon, added nutmeg and ginger. Reduced the vanilla because isn't the highlight the pumpkin flavor? I added molasses because it's the perfect compliment to pumpkin (brown sugar may give the same effect but it just seems heavy to me and I wanted a fluffy cookie, so I went with the combo of all granulated sugar plus molasses). I added a little red food coloring so they wouldn't look so  dull and drab (but of course you can leave it out if you'd like). I omitted the milk because I don't think it's necessary, I could be totally wrong though. Then lastly I used less chocolate chips, again so they wouldn't overpower the pumpkin flavor. I also used a combination of half milk chocolate and half semi sweet. I guess you could say I almost changed the entire recipe =), I kept the base ingredients the same though. I'm sure it's a great recipe as it's originally listed but like I said I just like to make a few changes. Enjoy these cake-y soft, sweetly spiced, perfectly moist Fall inspired cookies!


Pumpkin Chocolate Chip Cookies
Yields 2 1/2 dozen

Ingredients:
2 cups all-purpose flour
2 tsp baking powder
1 tsp baking soda
1 1/2 tsp ground cinnamon
1/2 tsp ground nutmeg
1/4 tsp ground ginger
1/2 tsp salt
1 cup canned pumpkin puree
1 cup granulated sugar
1/2 cup vegetable oil
1 large egg
2 tsp molasses
1 tsp vanilla extract
4 drops red food coloring (optional)
3/4 cup semi-sweet chocolate chips
3/4 cup milk chocolate chips

Directions:
Preheat oven to 350 degrees. In a mixing bowl, whisk together flour, baking powder, baking soda, cinnamon, nutmeg, ginger and salt, set aside. In the bowl of an electric stand mixer, combine pumpkin puree, granulated sugar, vegetable oil, egg, molasses, vanilla and optional food coloring. Blend mixture until combine. With mixer on low speed, slowly add in flour mixture and mix just until combine, scraping down the sides of the bowl as needed. With a rubber spatula, fold in chocolate chips. Drop dough 2 Tbsp at a time (try to pile them high for less spreading - therefor a thicker cookie) onto Silpat lined or greased baking sheets and baking in preheated oven 12 - 14 minutes until cookies are golden brown and nearly set. Allow to cool several minutes before transferring to a wire rack to cool completely. Store in a single layer in an airtight container (some people prefer them cold so you can also store them in the refrigerator if you'd like).

Recipe Source: adapted slightly from allrecipes.com

Kamis, 11 Oktober 2012

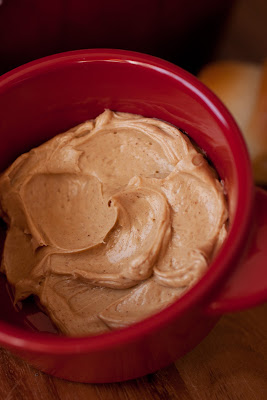
Whipped Specialty Butters


What is one out of the ordinary thing you should add as a new highlight to the Thanksgiving feast this year? Something that probably wouldn't have come to mind, whipped specialty butters to go along with those fresh out of the oven, homemade rolls. These butters are amazing! I was at my mother-in-laws a few days ago and she had fresh bread and some whipped cinnamon honey butter she'd bought at the store. I knew it would be a breeze to recreate after reading the ingredients list on the packaging label, so I came home and made it. In my opinion the homemade version may just be a bit better because it's freshly made, but other than that they taste exactly the same. 
I also decided to create a few other versions as well because why stop at just one flavor? There are many more I wanted to make but didn't have the time. Here's a few I had in mind: orange honey butter with orange extract and fresh orange zest, salted caramel butter with caramel sauce (rather than honey) and coarse sea salt, and lavender honey butter with dried lavender, because honey and lavender just go together. Really there are so many different flavors you could make, but if there's one you must try this Fall it's the Cinnamon Honey Butter. It makes an ordinary roll taste similar to a cinnamon roll.
Note that pictured is only 1/4 of each recipe just because I didn't want to use 3 cups of butter at once, there's no way my family of 4 could eat that much unless were were to serve it scooped over the top of ice cream cones. If it weren't so fattening I probably would like that =). 
If you are looking for a delicious dinner rolls recipe, I'd recommend trying this one. Enjoy!


Cinnamon Honey Butter

Ingredients:
1 cup salted butter, at room temperature
3/4 cup honey
1/2 cup powdered sugar
2 1/2 tsp molasses
2 tsp cinnamon

Directions:
In a mixing bowl, using an electric hand mixer on medium speed, whip together all ingredients until light and fluffy, about 2-3 minutes.


Raspberry Butter

Ingredients:
1 cup salted butter, at room temperature
1/2 cup raspberry jam, seedless if preferred
1/2 cup powdered sugar
1 tsp raspberry extract (add 1/2 tsp more for stronger raspberry flavor)

Direction:
In a mixing bowl, using an electric hand mixer on medium speed, whip butter until light and fluffy, about 2 minutes. Add in remaining ingredients and mix until well blended. 
Note: the raspberry is naturally pink no food coloring is needed.


Vanilla Bean Honey Butter

Ingredients:
1 cup salted butter, at room temperature
seeds of 1 vanilla bean
2/3 cup honey
1/2 cup powdered sugar
1 tsp vanilla extract

Directions:
In a mixing bowl, using an electric hand mixer on medium speed, whip together all ingredients until light and fluffy, about 2-3 minutes.


Recipe Source: Cooking Classy

Rabu, 10 Oktober 2012

Amazing Dinner Rolls


Is there anything like a fresh, hot out of the oven, homemade dinner roll? Dinner rolls are a classic that will never fade. These dinner rolls are dangerously good! How could something with so few simple ingredients be so delicious? I will tell you how: lots of butter, whole milk and a little patience. While creating this recipe, I was looking to achieve a tender, pillow-y soft texture, along with a light sweetness that wasn't overpowering (if I wanted a roll that was super sweet I'd just have cake), with just the right amount of moisture and fats - hence the use of whole milk along with the butter. I prefer a larger ratio of milk than water because water has zero flavor so why let it waste good space in the roll? 
I love making fresh breads and rolls, because I let my KitchenAid mixer do all the work =). The hardest part is that "little patience" I mentioned before, the rising time. I wish they'd just go POOF! in a number of seconds and be beautifully risen. If only. The nice thing about it though is that it basically forces me to get that sink-full of dishes done while I'm waiting. If you don't have a stand mixer you could also make these the good old fashioned way, kneading by hand. 
I hope you love these rolls and serve them as the perfect complement to your holiday feasts and family gatherings. Come back soon as I'll be posting 3 specialty butter recipes that you can spread along these divine dinner rolls (as if they needed any upgrade but these butters just push the rolls over the top).  Enjoy and share... really, because I'm warning you if you don't share you'll want all 24 rolls to yourself!

Dinner Rolls
Yields 2 dozen

Ingredients:
1/3 cup warm water, 110 - 115 degrees
2 1/4 tsp active dry yeast
1/3 cup + 1/4 tsp granulated sugar
1 1/3 cups whole or 2% milk, warmed to 110 - 115 degrees
3/4 cup salted butter, at room temperature, divided
1 large egg, at room temperature
1 1/2 tsp salt
4 1/2 cups all-purpose flour*

Directions:
Measure out warm water into a liquid measuring cup then stir in yeast and 1/4 tsp sugar, whisk until yeast has dissolved then let rest 5 - 10 minutes until mixture is foamy. Pour yeast mixture (scrapping out excess) into the bowl of an electric stand mixer fitted with whisk attachment, add in 1/3 cup sugar, warm milk, 5 Tbsp butter, egg and salt. Blend mixture until combine. Add in 2 cups flour and mix until well combine. Switch attachment to a dough hook, with mixer on low speed, slowly add remaining 2 1/2 cups flour and mix until dough is smooth and elastic, about 4 - 5 minutes (dough should be slightly sticky when touched). Transfer dough to a greased, large mixing bowl and cover bowl with plastic wrap. Allow dough to rise in a warm place, free from draft, until double in size, about 1 1/2 hours.
Punch dough down and divide dough into two equal portions. Shape each portion into a ball. Roll each dough ball out on a lightly floured surface into a large circle about 13 inches across (try to keep dough as much of an even thickness as possible). Spread each circle of dough evenly with 2 Tbsp butter. Cut each circle into 4 equal quarters, then each quarter into 3 wedges (just imagine cutting pizza slices or pie slices). Roll each wedge up, beginning on wide (outside) edge. Transfer rolls to a buttered 10 x 15 inch cookie sheet (the tip of the rolled wedge should be tucked on the bottom. Note that you can fit 3 rows of 8 rolls). Cover rolls loosely with plastic wrap and let rise in a warm place until double in size, about 1 hour. During the last 10 minutes of rising preheat oven to 375 degrees.
Remove plastic wrap and bake rolls in preheated oven for 15 - 20 minutes until golden brown. Remove from oven and brush with remaining 3 Tbsp butter (you may not need all of it). Serve warm or allow to cool and store in an airtight container.

*I found 4 1/2 cups to be perfect for me but if you live somewhere very dry or humid, or at a very high altitude you may want to reduce or increase measurement by a 1/4 of a cup, just note the dough should be fairly sticky. Don't add too much flour or your roll will be heavy. The dough should be sticking to the bottom of the mixing bowl near the end of mixing just not the sides. It should stick slightly to a clean fingertip then spring back slightly when pulled away.

Recipe Source: Cooking Classy


After first rise, divide dough into two equal portions and shape each into a ball.
 Roll each ball into a 13 inch circle.
 Spread softened butter evenly over entire surface. Using a pizza wheel, cut circle into 4 equal quarters then cut each quarter into 3 equal wedges.
 Snugly roll each wedge.
 The tip of the wedge should be tucked under the bottom, like so.
 Transfer and align rolls on a buttered baking dish.
 Cover with plastic wrap and let rest until double in size, about 1 hour.
 Bake in preheated oven 14 - 16 minutes.
Coat tops with butter.
 Pull rolls apart. Serve warm.