Tampilkan postingan dengan label marshmallow. Tampilkan semua postingan

Sabtu, 24 November 2012

Brownie Cupcakes with Marshmallow Frosting


If there are two things I love it's brownies and marshmallows. Okay okay there are a lot of foods I love and adore but two of them are definitely brownies and marshmallows. I also love the combination of the two. The chocolate just compliments the marshmallows perfectly. Like a S'more or a chocolate covered marshmallow, they just wouldn't be what they are without the chocolate. 
This cupcake took three attempts to get the cupcake base just where I wanted it. I don't like a brownie that's so chocolaty rich I can only eat a bite or two. I also don't like a brownie that has no body to it and it's completely gooey. It's needs some chew and bite to it. Basically I'm more of a traditional, milk chocolate brownie kind of gal. 
Just an fyi these cupcakes aren't a fluffy dome like cupcake. They will likely sink just a bit in the middle once they are removed from the oven, that's supposed to happen. If they don't then it's a sign they are likely over-baked and dry. The marshmallow frosting is delicious toasted but it most definitely doesn't have to be. Toasted or not this frosting reminds me of the soft center of a gooey marshmallow that was slowly roasted over the hot coals of a campfire. It is fluffy, dreamy, bliss in frosting form and it is actually incredibly easy to prepare. The stand mixer does most of the work. Enjoy!


Brownie Cupcakes with Marshmallow Frosting
Yields 12 cupcakes

Ingredients:
1 1/4 cups all-purpose flour
1/4 tsp baking powder
1/4 tsp salt
1 cup granulated sugar
1/2 cup packed light-brown sugar
1/2 cup + 2 Tbsp cocoa powder
3/4 cup butter, melted
2 large eggs
1 1/2 tsp vanilla extract
2 Tbsp milk

Marshmallow Frosting:
4 large egg whites
1 cup granulated sugar
1/4 tsp cream of tartar
1 tsp vanilla extract

Directions:
Preheat oven to 350 degrees. In a mixing bowl whisk together flour, baking powder and salt, set aside. In a separate mixing bowl, whisk together granulated sugar, light-brown sugar and cocoa powder. Pour in melted butter and use a wood spoon to stir until combine. Mix in eggs and vanilla extract. Stir in milk. Add dry ingredients and mix just until combine (batter will be thick). 
Divide batter among 12 paper lined muffin cups filling each about 2/3 full (about 1/4 cup batter in each). Bake in preheated oven 16 - 20 minutes (lesser for gooier brownies). Allow to cool in muffin tin several minutes before transferring to a wire rack to cool. Cool completely then pipe Marshmallow Frosting over cupcakes and toast edges of frosting with a kitchen torch if desired.

For the Marshmallow Frosting:
Add egg whites, granulated sugar and cream of tarter to a heat proof bowl of an electric mixer. Set bowl over a saucepan filled with a few inches of simmering water.  Heat mixture, whisking constantly until egg whites are very warm to the touch, about 4 minutes (mixture so register 160 degrees on a candy thermometer). Remove from heat and transfer bowl to electric stand mixer fit with a whisk attachment. Beat mixture beginning on low speed and gradually increasing to high speed, until stiff glossy peaks form, about 6 - 8 minutes. Add vanilla during the last 10 seconds of mixing. For best results serve immediately.

Recipe Source: Brownie Cupcakes - Cooking Classy, Marshmallow Frosting - Martha Stewart


Rabu, 14 November 2012

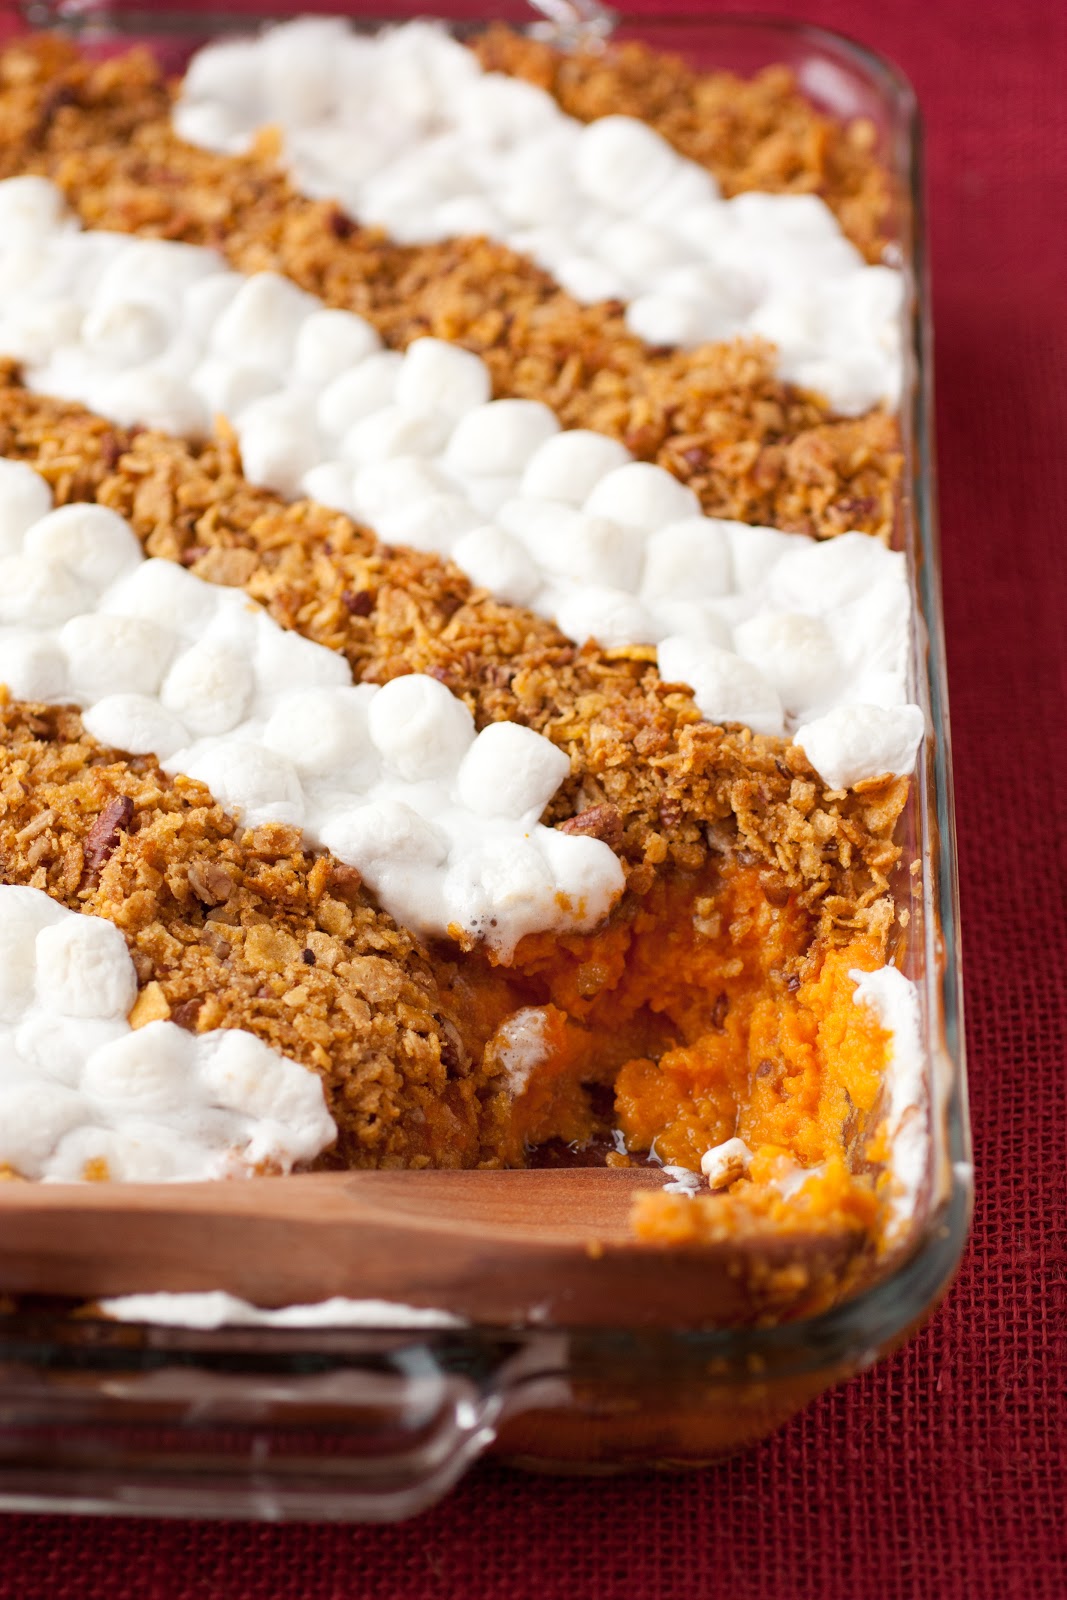
Browned Butter Sweet Potato Casserole


I'm not a huge casserole fan but this is the best sweet potato thing I've ever eaten! It's time for dinner and I would rather just skip the dinner meal and have a heaping plate of this in its place. I would be happy if this were the only thing I had to eat for the thanksgiving feast =). 
Growing up I never cared for sweet potato anything but that has definitely changed. Now I say it's a Thanksgiving must! It's basically a dessert that passes for a side, so how could you not love it? 
This recipe is a pretty basic recipe. I chose not to add in any spices, cream, citrus or even vanilla because I didn't want to drown out any of that incredible browned butter flavor. Some of you may be thinking this girl puts browned butter in everything. And I say, well why not? My motto: if it's going to have butter it may as well be browned. There are some exceptions to that but not many. Browned butter enhances everything that's lucky enough to contain it's goodness. When it's added to something along with brown sugar it seems to give it a caramel-y flavor. Another highlight of make this recipe is that you won't need to light any scented candles for the holiday =). To me browned butter is basically the best scent in the world. I want to cook it sometimes just so my home can be filled with it's captivating, delightfully fragrant, nutty, caramel-like smell. Does it come in perfume?
The other thing I chose to do with this recipe is yo use two toppings. Why stick with just one? That way it gives people two options to choose from, the marshmallow or crunchy pecan corn flake topping. I always take a scoop that has half of each because I love them both. Enjoy and Happy Holidays!


Browned Butter Sweet Potato Casserole
Yields about 12 servings

Ingredients:
5 lbs sweet potatoes
1/2 cup salted butter, diced into 1-inch pieces
1/2 cup granulated sugar
1/4 cup packed light-brown sugar
1/4 tsp salt
3 large eggs
1/3 cup milk

Topping:
2 1/4 cups crushed corn flakes (begin with about 5 cups and crush to about 2 1/4 cups)
1/2 cup chopped pecans (I used pre-chopped pecan chips to save time)
1/4 cup packed light-brown sugar
1/4 cup salted butter, diced into 1-inch pieces
3 cups miniature marshmallows

Directions:
Preheat oven to 400 degrees. Pierce each sweet potato several times with a fork and transfer to a rimmed cookie sheet. Bake about 1 hour, or until very tender when pierced with a fork. Meanwhile brown 1/2 cup butter in a medium saucepan over medium heat, swirling pan occasionally (for stages of browning butter see notes below).
Remove potatoes from oven and reduce oven temperature to 350. Cut each in half and scoop out flesh into a large mixing bowl. Mash potatoes with a potato masher. Pour in 1/2 cup browned butter, using a rubber spatula to scrape excess butter from pan, add granulated sugar, 1/4 cup light-brown sugar and salt then using an electric hand mixer set on low speed, blend together until well combine. Add in eggs and mix until well blended, then pour in milk and mix until well blended. Pour mixture into a buttered 13 x 9 baking dish and spread into an even layer. 
Brown remaining 1/4 cup butter in a saucepan. Pour crushed cornflakes into a mixing bowl, along with chopped pecans and 1/4 cup light-brown sugar and mix to combine. Pour browned butter over mixture and toss to evenly coat. Spread mixture into diagonal rows over mashed sweet potato mixture leaving about a 1 1/2-inch gap between rows. Bake in preheated oven (350 degrees) for 30 minutes, then remove from oven and spread marshmallows between rows of corn flake topping. Return to oven and bake until marshmallows are lightly golden about 8 - 12 minutes (I didn't brown mine much because I like the contrast of color between the white of the marshmallow and golden brown of the corn flake topping). Serve warm. Store in refrigerator in an airtight container.

Stages of browning butter: butter will first melt, it will become lemony yellow and after a minute or two it will begin to splatter a bit, then it will foam and begin to smell nutty, then little brown specks will begin to appear in the center of the golden foamy bubbles - this is when you remove it from heat. I wait just a few seconds for a generous amount of specs maybe a 2-inch circle before removing from heat. Color wise it should go from a yellow, to golden tan, to an orange-y toasty golden brown. I personally like to push it to the limit before removing from heat to get a really nice browned flavor, be sure you don't take it off too early while also not waiting too long.

Note that if you are making this in advance to refrigerate then bake the following day, don't add the corn flake topping until baking or it will become stale. Also I'd recommend placing cold casserole in cool oven and let it preheat with oven. 

Recipe Source: Cooking Classy


Rabu, 17 Oktober 2012

Homemade Peppermint Marshmallows - The Perfect Hot Cocoa Stirrers


I know I know, you're thinking Christmas already!? Well, these aren't just a Christmas treat. Yes they do make a wonderful and festive Christmas treat but to me these are the best upgrade hot cocoa has ever been given, and hot cocoa isn't just for Christmas. 
Words nearly cannot express the complete and utter bliss I experienced when dipping one of these chocolate and peppermint candy coated homemade peppermint marshmallows into a cup of hot cocoa. And I used to think dunking Twix candy bars in hot cocoa was good. It's like winter S'mores somehow. As you dunk and swirl the marshmallow the chocolate coating becomes warm and turns to the most incredible melt-y goodness, and the peppermint candy softens a bit while it's flavors prepare you for the dreaminess ahead, then the best part - the marshmallow will melt and puff a little as it becomes creamy and inexplicable delicious. Heaven on a stick. I want the whole batch of chocolate covered homemade marshmallows to myself but somehow I must learn to share because these are too good not to share. I thought of calling these Peppermint Hot Cocoa Stirrers because I think hot cocoa dipping is definitely their best use, but you can call them what ever you'd like.
This was only my second time making homemade marshmallows (don't ask me why I haven't made them a million times more because they are so good) so don't worry they really are quite simple to make. The mixer does the hard part. The key is just in following directions. Alton Brown's recipe for marshmallows is the one I made a few years ago and this time around and it's probably the only one I will ever need. The only change I made was replacing the vanilla extract with peppermint extract. I hope you love these irresistible treats as much as I do! Enjoy!


Peppermint Marshmallows
Yields about 32 large marshmallows

Ingredients:
3 packages unflavored gelatin
1 cup ice cold water, divided
1 1/2 cups granulated sugar
1 cup light corn syrup
1/4 tsp salt
1/2 - 1 tsp peppermint extract, to taste*
1/4 cup powdered sugar
1/4 cup cornstarch
butter, for coating baking dish

Directions:
Place gelatin in the bowl of an electric stand mixer fitted with whisk attachment. Pour in 1/2 cup ice cold water (don't mix yet), let rest while you prepare sugar syrup.
In a small saucepan, combine remaining 1/2 cup water, granulated sugar, corn syrup and salt. Cover saucepan with lid and heat mixture over medium heat for 3 - 4 minutes. Uncover saucepan and cook mixture, without stirring, until mixture reaches exactly 240 degrees on a candy thermometer. Once mixture reaches 240 degrees immediately remove from heat. 
Turn stand mixer on low speed and with mixer running, slowly and carefully pour the hot sugar syrup down the side of the mixing bowl into the gelatin mixture. Once all the syrup has been added, increase mixer to high speed (I set mine on the 8 of the KitchenAid stand mixer) and whip mixture until it is lukewarm, very fluffy and very thick, about 12 - 15 minutes. Add the peppermint extract during the last minute of mixing. While the mixture is blending, in a small bowl whisk together powdered sugar and cornstarch then run a stick of butter along the bottom and edges of an 11 x 7 inch baking dish (making sure you coat all areas, including corners, to prevent sticking). Sprinkle a few tbsp of the powdered sugar/cornstarch mixture over the buttered baking dish and move dish back and forth to evenly coat, then shake off excess.
Coat a rubber spatula with butter, then pour whipped mixture into prepared baking dish using the coated spatula to scrape mixture out. Spread mixture into an even layer in baking dish using butter coated spatula. Sprinkle top lightly and evenly with powdered sugar mixture, reserving remaining sugar mixture. Allow marshmallows to rest uncovered at least 4 hours or up to overnight.
Turn the set marshmallows out onto a cutting board (you will likely have to run something around the edges and slightly along the bottom help the marshmallows drop) and cut marshmallows into squares using a pizza wheel dusted with powdered sugar mixture (I cut mine into 8 rows then each row into 4 because I wanted them tall for dipping but you could cut more than that if you want). Place cut marshmallows in powdered sugar mixture and turn to coat all sticky sides, dusting off excess (dust them off well if dipping/spreading with chocolate or it wont stick well). Store in an airtight container for up to 3 weeks.

*If you are making them to dip in hot cocoa I would recommend the full 1 tsp, if you are making them just to eat on their own I may go with 1/2 tsp. You can add 1/2 tsp first then taste a bit and if you want a stronger peppermint flavor add another 1/2 tsp.

Recipe Source: Marshmallow recipe adapted from Alton Brown via Food Network (non-peppermint version)

Peppermint Bark Marshmallows

Ingredients:
12 oz. chopped chocolate, semi-sweet chocolate chips or almond bark
3/4 cup crushed candy canes
1 recipe peppermint marshmallows, above (store bought marshmallows would work fine too)
lollipop sticks or straws 

Directions:
Spread a sheet of wax or parchment paper on counter (this is where dipped marshmallows will set). Melt chocolate in microwave on 50% power in 30 second intervals, stirring after each interval until melted and smooth. Spread a layer of melted chocolate over bottom half of marshmallow, then dip chocolate coated portion in crushed peppermint (alternately you can dip the marshmallows in the melted chocolate, I just found spreading it on worked better for me. It seemed too thick and messy so I just used an icing spatula to spread it on instead. Almond bark may work better for dipping because it has a thinner consistency), then place coated marshmallow chocolate coated side down on wax paper. Insert a lollipop stick through the top and center of each marshmallow (if using), then let rest at room temperature until chocolate has set, about 1 hour. Store in an airtight container.