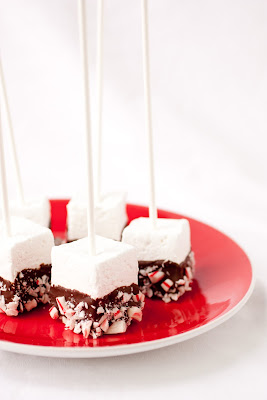
Words nearly cannot express the complete and utter bliss I experienced when dipping one of these chocolate and peppermint candy coated homemade peppermint marshmallows into a cup of hot cocoa. And I used to think dunking Twix candy bars in hot cocoa was good. It's like winter S'mores somehow. As you dunk and swirl the marshmallow the chocolate coating becomes warm and turns to the most incredible melt-y goodness, and the peppermint candy softens a bit while it's flavors prepare you for the dreaminess ahead, then the best part - the marshmallow will melt and puff a little as it becomes creamy and inexplicable delicious. Heaven on a stick. I want the whole batch of chocolate covered homemade marshmallows to myself but somehow I must learn to share because these are too good not to share. I thought of calling these Peppermint Hot Cocoa Stirrers because I think hot cocoa dipping is definitely their best use, but you can call them what ever you'd like.
This was only my second time making homemade marshmallows (don't ask me why I haven't made them a million times more because they are so good) so don't worry they really are quite simple to make. The mixer does the hard part. The key is just in following directions. Alton Brown's recipe for marshmallows is the one I made a few years ago and this time around and it's probably the only one I will ever need. The only change I made was replacing the vanilla extract with peppermint extract. I hope you love these irresistible treats as much as I do! Enjoy!
Yields about 32 large marshmallows
Ingredients:
3 packages unflavored gelatin
1 cup ice cold water, divided
1 1/2 cups granulated sugar
1 cup light corn syrup
1/4 tsp salt
1/2 - 1 tsp peppermint extract, to taste*
1/4 cup powdered sugar
1/4 cup cornstarch
butter, for coating baking dish
Directions:
Place gelatin in the bowl of an electric stand mixer fitted with whisk attachment. Pour in 1/2 cup ice cold water (don't mix yet), let rest while you prepare sugar syrup.
In a small saucepan, combine remaining 1/2 cup water, granulated sugar, corn syrup and salt. Cover saucepan with lid and heat mixture over medium heat for 3 - 4 minutes. Uncover saucepan and cook mixture, without stirring, until mixture reaches exactly 240 degrees on a candy thermometer. Once mixture reaches 240 degrees immediately remove from heat.
Turn stand mixer on low speed and with mixer running, slowly and carefully pour the hot sugar syrup down the side of the mixing bowl into the gelatin mixture. Once all the syrup has been added, increase mixer to high speed (I set mine on the 8 of the KitchenAid stand mixer) and whip mixture until it is lukewarm, very fluffy and very thick, about 12 - 15 minutes. Add the peppermint extract during the last minute of mixing. While the mixture is blending, in a small bowl whisk together powdered sugar and cornstarch then run a stick of butter along the bottom and edges of an 11 x 7 inch baking dish (making sure you coat all areas, including corners, to prevent sticking). Sprinkle a few tbsp of the powdered sugar/cornstarch mixture over the buttered baking dish and move dish back and forth to evenly coat, then shake off excess.
Coat a rubber spatula with butter, then pour whipped mixture into prepared baking dish using the coated spatula to scrape mixture out. Spread mixture into an even layer in baking dish using butter coated spatula. Sprinkle top lightly and evenly with powdered sugar mixture, reserving remaining sugar mixture. Allow marshmallows to rest uncovered at least 4 hours or up to overnight.
Turn the set marshmallows out onto a cutting board (you will likely have to run something around the edges and slightly along the bottom help the marshmallows drop) and cut marshmallows into squares using a pizza wheel dusted with powdered sugar mixture (I cut mine into 8 rows then each row into 4 because I wanted them tall for dipping but you could cut more than that if you want). Place cut marshmallows in powdered sugar mixture and turn to coat all sticky sides, dusting off excess (dust them off well if dipping/spreading with chocolate or it wont stick well). Store in an airtight container for up to 3 weeks.
*If you are making them to dip in hot cocoa I would recommend the full 1 tsp, if you are making them just to eat on their own I may go with 1/2 tsp. You can add 1/2 tsp first then taste a bit and if you want a stronger peppermint flavor add another 1/2 tsp.
Recipe Source: Marshmallow recipe adapted from Alton Brown via Food Network (non-peppermint version)
Peppermint Bark Marshmallows
Ingredients:
12 oz. chopped chocolate, semi-sweet chocolate chips or almond bark
3/4 cup crushed candy canes
1 recipe peppermint marshmallows, above (store bought marshmallows would work fine too)
lollipop sticks or straws
Directions:
Spread a sheet of wax or parchment paper on counter (this is where dipped marshmallows will set). Melt chocolate in microwave on 50% power in 30 second intervals, stirring after each interval until melted and smooth. Spread a layer of melted chocolate over bottom half of marshmallow, then dip chocolate coated portion in crushed peppermint (alternately you can dip the marshmallows in the melted chocolate, I just found spreading it on worked better for me. It seemed too thick and messy so I just used an icing spatula to spread it on instead. Almond bark may work better for dipping because it has a thinner consistency), then place coated marshmallow chocolate coated side down on wax paper. Insert a lollipop stick through the top and center of each marshmallow (if using), then let rest at room temperature until chocolate has set, about 1 hour. Store in an airtight container.


Tidak ada komentar:
Posting Komentar