Tampilkan postingan dengan label Thanksgiving. Tampilkan semua postingan

Rabu, 14 November 2012

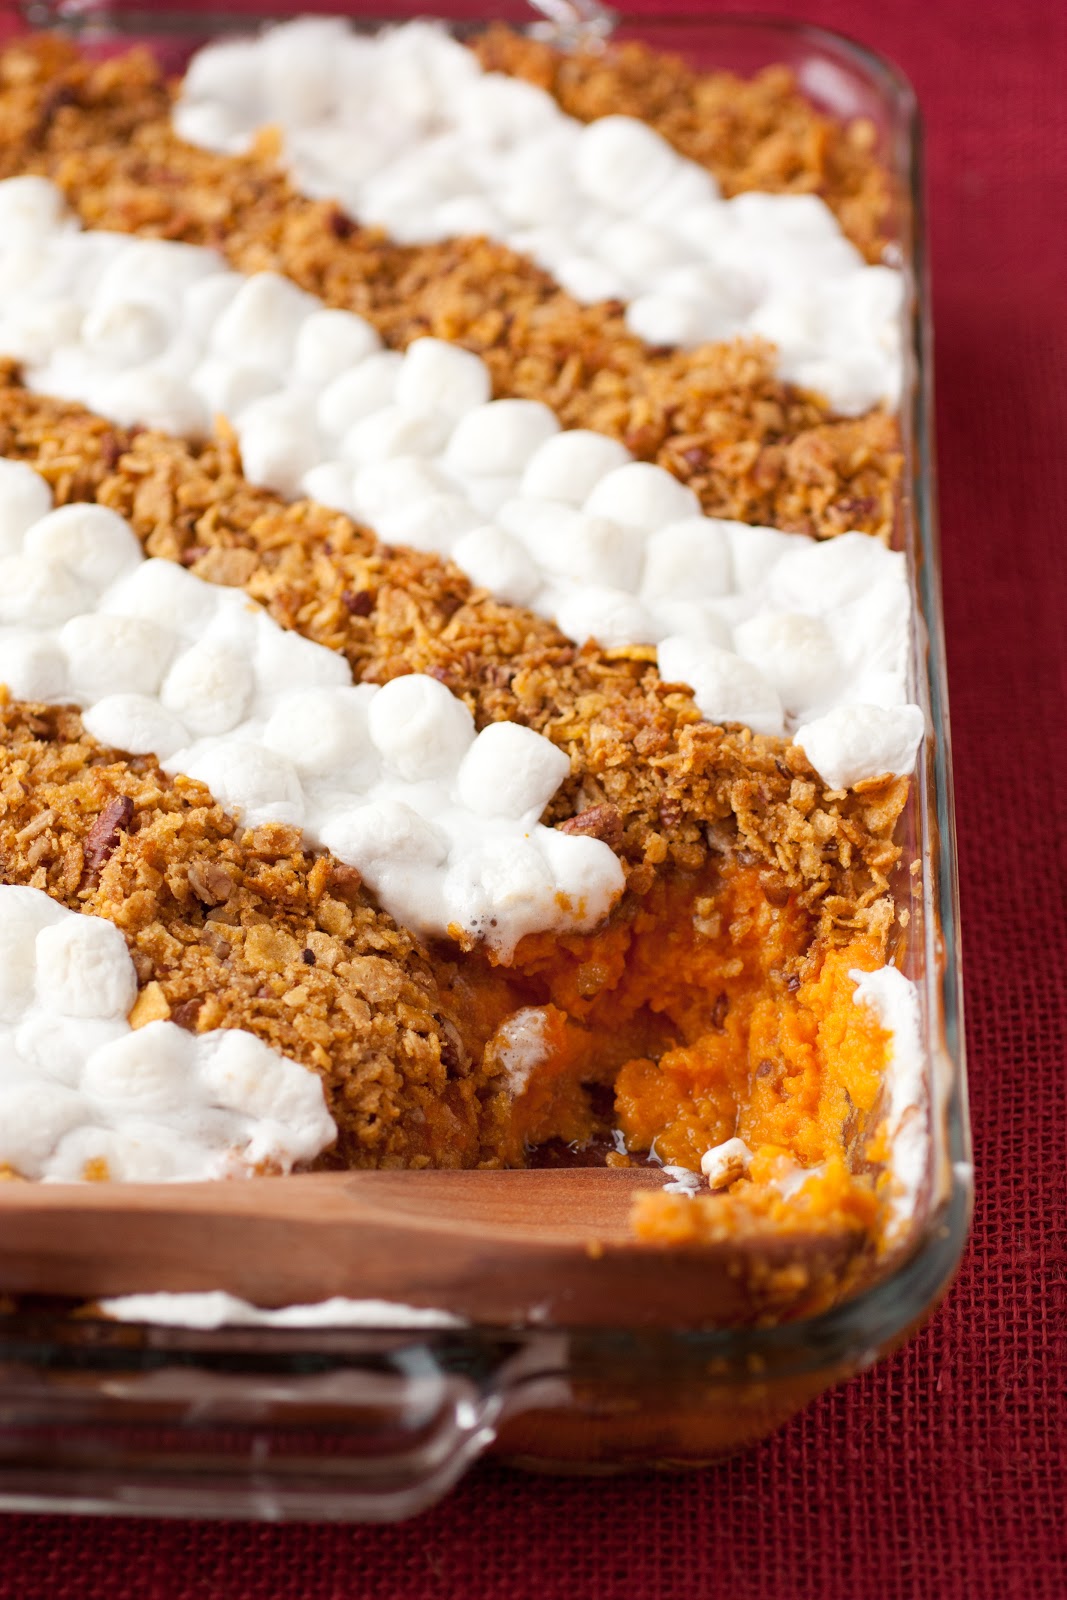
Browned Butter Sweet Potato Casserole


I'm not a huge casserole fan but this is the best sweet potato thing I've ever eaten! It's time for dinner and I would rather just skip the dinner meal and have a heaping plate of this in its place. I would be happy if this were the only thing I had to eat for the thanksgiving feast =). 
Growing up I never cared for sweet potato anything but that has definitely changed. Now I say it's a Thanksgiving must! It's basically a dessert that passes for a side, so how could you not love it? 
This recipe is a pretty basic recipe. I chose not to add in any spices, cream, citrus or even vanilla because I didn't want to drown out any of that incredible browned butter flavor. Some of you may be thinking this girl puts browned butter in everything. And I say, well why not? My motto: if it's going to have butter it may as well be browned. There are some exceptions to that but not many. Browned butter enhances everything that's lucky enough to contain it's goodness. When it's added to something along with brown sugar it seems to give it a caramel-y flavor. Another highlight of make this recipe is that you won't need to light any scented candles for the holiday =). To me browned butter is basically the best scent in the world. I want to cook it sometimes just so my home can be filled with it's captivating, delightfully fragrant, nutty, caramel-like smell. Does it come in perfume?
The other thing I chose to do with this recipe is yo use two toppings. Why stick with just one? That way it gives people two options to choose from, the marshmallow or crunchy pecan corn flake topping. I always take a scoop that has half of each because I love them both. Enjoy and Happy Holidays!


Browned Butter Sweet Potato Casserole
Yields about 12 servings

Ingredients:
5 lbs sweet potatoes
1/2 cup salted butter, diced into 1-inch pieces
1/2 cup granulated sugar
1/4 cup packed light-brown sugar
1/4 tsp salt
3 large eggs
1/3 cup milk

Topping:
2 1/4 cups crushed corn flakes (begin with about 5 cups and crush to about 2 1/4 cups)
1/2 cup chopped pecans (I used pre-chopped pecan chips to save time)
1/4 cup packed light-brown sugar
1/4 cup salted butter, diced into 1-inch pieces
3 cups miniature marshmallows

Directions:
Preheat oven to 400 degrees. Pierce each sweet potato several times with a fork and transfer to a rimmed cookie sheet. Bake about 1 hour, or until very tender when pierced with a fork. Meanwhile brown 1/2 cup butter in a medium saucepan over medium heat, swirling pan occasionally (for stages of browning butter see notes below).
Remove potatoes from oven and reduce oven temperature to 350. Cut each in half and scoop out flesh into a large mixing bowl. Mash potatoes with a potato masher. Pour in 1/2 cup browned butter, using a rubber spatula to scrape excess butter from pan, add granulated sugar, 1/4 cup light-brown sugar and salt then using an electric hand mixer set on low speed, blend together until well combine. Add in eggs and mix until well blended, then pour in milk and mix until well blended. Pour mixture into a buttered 13 x 9 baking dish and spread into an even layer. 
Brown remaining 1/4 cup butter in a saucepan. Pour crushed cornflakes into a mixing bowl, along with chopped pecans and 1/4 cup light-brown sugar and mix to combine. Pour browned butter over mixture and toss to evenly coat. Spread mixture into diagonal rows over mashed sweet potato mixture leaving about a 1 1/2-inch gap between rows. Bake in preheated oven (350 degrees) for 30 minutes, then remove from oven and spread marshmallows between rows of corn flake topping. Return to oven and bake until marshmallows are lightly golden about 8 - 12 minutes (I didn't brown mine much because I like the contrast of color between the white of the marshmallow and golden brown of the corn flake topping). Serve warm. Store in refrigerator in an airtight container.

Stages of browning butter: butter will first melt, it will become lemony yellow and after a minute or two it will begin to splatter a bit, then it will foam and begin to smell nutty, then little brown specks will begin to appear in the center of the golden foamy bubbles - this is when you remove it from heat. I wait just a few seconds for a generous amount of specs maybe a 2-inch circle before removing from heat. Color wise it should go from a yellow, to golden tan, to an orange-y toasty golden brown. I personally like to push it to the limit before removing from heat to get a really nice browned flavor, be sure you don't take it off too early while also not waiting too long.

Note that if you are making this in advance to refrigerate then bake the following day, don't add the corn flake topping until baking or it will become stale. Also I'd recommend placing cold casserole in cool oven and let it preheat with oven. 

Recipe Source: Cooking Classy


Selasa, 13 November 2012

Roasted Turkey


If you ask me, it only takes 3 ingredients (well 4 if you count the water) to prepare a perfect roasted turkey. In other words the perfect Thanksgiving turkey, the most important part of the Thanksgiving feast. We only have roasted turkey in my home about 5 times a year so I'm definitely not perfect at preparing one. That is why this time around I turned to Cook's Illustrated to follow their advice for brining and roasting turkey. I'm so glad I did as I achieved incredible results. I always thought it took plenty of fancy fresh herbs and a jumble of other ingredients to get a delicious turkey. That was definitely a misconception. If you ask me, some of those things can seemingly hide the delicious flavors of the turkey. All you need is a turkey, salt, water, a bit of butter along with a few easy steps and you'll have a turkey that is moist, flavorful and tender with a perfectly golden, crispy skin. It's likely that no one will even be reaching for the salt with this turkey. The brine get's the job done. I think this will now be my go to Thanksgiving turkey recipe. Easy and delicious! Happy Thanksgiving everyone!


 After brining, for an extra crispy skin allow to air dry in refrigerator for 8 hours  on top of a cooling rack set over a rimmed cookie sheet (optional).
 If you don't have a large roasting rack, you can use a large tin, if you don't own a V-rack you can create one using two grates from a gas oven or two racks from a toaster oven. No matter what you use for the V-rack, just be sure to line it with foil and poke holes in the foil.

 Brush both sides with 2 Tbsp melted butter, then roast breast side down first.

Perfectly crisp, golden skin, with a moist deliciously seasoned interior. A Thanksgiving Turkey to remember...

Brined and Roasted Turkey

Ingredients:
1 (12 - 14 lb) untreated turkey, rinsed thoroughly*
1/2 - 1 cup Table salt, depending on brine time
4 Tbsp butter, melted

Directions:

1. For the brine: for a 4 - 6 hour brinedissolve 1 cup of table salt per 1 gallon of water. For a 12 - 14 hour brine, dissolve 1/2 cup of table salt per 1 gallon of water. Place turkey in an extra large food safe bag (such as a Reynolds Turkey Size Oven Bag), a large stockpot or a clean bucket. Pour enough of the salt water over turkey to completely cover (tie knot bag if using a bag) and refrigerate turkey for predetermined amount of time. 

2. Before removing turkey from brine, adjust oven rack to lowest or second to lowest position (Cook's Illustrated stated "lowest" in their recipe, I actually went with second to lowest). Preheat oven to 400 degrees**. Line a large V-rack with heavy duty aluminum foil or two layers of regular foil, and using a pairing knife poke 20 - 30 holes in foil. Set lined V-rack in a large roasting pan.

3. After soaking turkey in brine, remove from refrigerator and thoroughly rinse turkey under cold tap water. Using paper towels, pat turkey dry inside and out. With the breast side facing upward, tuck wingtips underneath the bottom side of turkey and tuck ends of drumsticks into skin at tail to secure***. Then brush turkey (breast side up) with 2 Tbsp melted butter, then rotate turkey and set breast-side down on prepared V-rack and brush opposite side with remaining 2 Tbsp melted butter. Roast turkey for 1 hour.

4. Carefully remove turkey in roasting pan from oven (and close oven door so the heat doesn't escape). Using clean kitchen towels or pot holders, lift turkey and rotate to opposite side - it should now be breast side up. Return turkey in roasting pan to oven and continue to roast until thickest part of breast registers 165 degrees on an instant read thermometer, and the thickest part of thigh registers 175 degrees, about 60 minutes (if you don't like juicy turkey you will definitely want to bake it longer). Remove from oven and transfer turkey to a carving board, allow turkey to rest 30 minutes. Carve and serve with freshly ground black pepper if desired (mine didn't need any salt). 

*Do not use a pre-seasoned, self-basting or Kosher turkey.
**I would recommend roasting at 450 degrees for the first hour then reducing oven temp to 400 degrees for the second hour. Cooks Illustrated left the oven at 400 degrees the entire time.
***Or for an optional step if you prefer an extra crispy skin on your turkey you can air dry the turkey in the refrigerator. To do so, place brined and rinsed turkey on a cooling rack set over a rimmed cookie sheet and allow turkey to rest in refrigerator for at least 8 hours (so obviously you wont need to preheat oven until later). Then proceed with the recipe (in step 3, brushing with butter). Again this is an optional step and only needed if you want a an extra crispy skin. 

Recipe Source: adapted from Cook's Illustrated All-Time Best Recipes, pg 40 - 41 "How to Brine and Roast Turkey" (can also be found here).

Sabtu, 10 November 2012

Pumpkin Cheesecake with Salted Caramel Sauce


What is the best part of the holidays? Family, friends and FOOD of course! I love that I get to indulge in the deliciousness of the holidays a little early since I like to post the holiday recipes before the holidays arrive. This time around I wanted to create a dessert recipe that would be an exciting twist on a classic. I just have to say it, this cheesecake is dee-vine! Just imagine your favorite pumpkin pie meets a fluffy, rich cheesecake and then it's generously covered in salted caramel sauce and finished with sweetened whipped cream. Yeah, almost to good to be true. I don't know that I'm going to care much about pumpkin pie during the holidays anymore, this has definitely stolen its limelight for me. Start the holidays out right, with a gourmet and autumn inspired cheesecake! Enjoy!


Pumpkin Cheesecake with Salted Caramel Sauce
Yields about 10 servings
Ingredients:
1 3/4 cups crushed graham crackers (from 14 sheets)

1/3 cup packed light-brown sugar
6 Tbsp salted butter, melted

3 (8 oz) pkg cream cheese, softened (I recommend using Philadelphia)
1 cup packed light-brown sugar
1/2 cup granulated sugar
3 Tbsp all-purpose flour
1 tsp ground cinnamon
1/2 tsp ground nutmeg
1/2 tsp ground ginger
1 1/2 cups pumpkin puree
1 1/2 tsp vanilla extract
2 large eggs
3 large egg yolks

topping:
caramel sauce, store bought or homemade, recipe follows 
coarse sea salt
sweetened whipped cream, for serving (optional)

Directions:
To prepare crust: Preheat oven to 350 degrees. In a large mixing bowl, mix together crushed graham crackers and light-brown sugar (being sure to break up any clumps of the brown sugar). Pour in melted butter and mix until mixture is evenly coated. Firmly press mixture into the bottom and sides of a 9-inch spring-form pan coming within about 1-inch of the top edge. Bake in preheated oven for 8-9 minutes until lightly browned. Remove from oven and allow to cool while preparing filling. Reduce oven temperature to 325 degrees.

To prepare filling: In a large mixing bowl, using an electric hand mixer set on low speed, blend together cream cheese, light-brown sugar and granulated sugar until smooth, about - 30 seconds. Mix in flour, cinnamon, nutmeg and ginger. Add in pumpkin and vanilla and mix on low speed just until combined. Add in whole eggs one at a time, mixing after each addition just until combine, then add in egg yolks and mix just until combine. Lift and tap mixing bowl against the counter several times to release air bubbles from mixture. Pour mixture into graham cracker crust and bake in preheated oven (325 degrees) for 1 hour, then turn oven off and allow cheesecake to rest in oven 25 - 30 minutes (without opening oven door). Remove from oven and allow to cool 15 minutes, then cover with plastic wrap and chill 5 hours. Slice and drizzle each serving with a generous amount of caramel sauce, sprinkle with a pinch of coarse sea salt then top with optional sweetened whipped cream. Store in refrigerator in an airtight container.

Caramel Sauce

Ingredients:
1 cup granulated sugar
1/4 cup water
1/4 cup salted butter
2/3 cup heavy cream

Directions:
Gather all of your ingredients and have them nearby ready to add to the mixture as needed. In a heavy-bottomed 3 quart saucepan, heat sugar and water over moderately high heat whisking constantly to dissolve sugar. Once mixture reaches a boil, stop whisking and allow mixture to boil until it reaches a dark amber color, carefully swirling pan occasionally. Once mixture reaches a dark amber color, immediately add butter and whisk until butter has melted then immediately remove from heat. Wait 3 seconds then carefully pour in cream and immediately whisk to combine (it will bubble vigorously). Whisk until mixture is smooth. Allow caramel to cool several minutes then pour into a glass jar to cool completely.


Recipe Source: Cooking Classy


Jumat, 02 November 2012

Apple Pie Dip


One pin down 1,000 to go. I love when I finally get around to trying that pin I've been wanting to make. I found this over at The Pea Kitchen a few months ago and have thought about making it many times since. I figured Thanksgiving season would be the perfect time. It's pie season! This dip is quick and easy and it tastes just like a delicious apple pie filling. So you get all the flavors of apple pie without the wait and without all that tedious prep work. I think this recipe has also inspired me to sprinkle my apple pie crust with cinnamon and sugar this year, yum!
There are many different ways you could serve this and I've listed in the recipe a few ideas. I left them out of the picture just so you could get a good glimpse of the actual apple pie dip, but If you were to serve it with the ice cream or whipped cream it would be even more like the real thing, and the caramel sauce would just take it over the top.
Also, the cinnamon sugar chips are such a simple and delicious Mexican dessert that can be used for other desserts or they are delicious all on their own. Many Mexican restaurants serve them drizzled with chocolate sauce, caramel sauce and sweetened whipped cream for a simple dessert that is sure to satisfy. Enjoy!


Apple Pie Dip
Yields about 3 servings

Ingredients:
3 cups peeled and diced Granny Smith apples (about 3 medium apples)*
2 tsp lemon juice
1/4 cup + 2 Tbsp packed light-brown sugar
1/4 tsp ground cinnamon
1/8 tsp ground nutmeg
2 Tbsp butter, diced
1 1/2 tsp cornstarch
2 1/2 tbsp water
Fried cinnamon sugar flour tortilla chips for serving, recipe follows
Vanilla ice cream, sweetened whipped cream or caramel sauce, optional

Directions:
Heat diced apples, lemon juice, light-brown sugar, cinnamon and nutmeg in a medium saucepan over medium high heat. Bring mixture to a boil, stirring frequently, then reduce heat slightly and allow to cook until apples are tender. Then add butter and stir until melted. In a small bowl whisk together cornstarch and water until well combine, then while stirring, pour cornstarch mixture over apple mixture and stir until thickened (it should thickena quickly). Serve warm covered with optional sweetened whipped cream. ice cream or caramel sauce along with cinnamon sugar tortilla chips for dipping (alternately you can layer the chips followed by ice cream and finish with apple pie mixture rather than dipping).

*I'd recommend dicing them into very small pieces about 1/4 - 1/2-inch since this is for dipping, it will also help them soften faster.

Cinnamon Sugar Tortilla Chips

Ingredients:
6 flour tortillas, sliced into wedges using a pizza wheel (I did half flour half whole wheat)
1/4 cup granulated sugar
1 tsp ground cinnamon
Vegetable oil, for frying

Directions:
In a small bowl, whisk together sugar and cinnamon, set aside. Line a baking sheet or several plates with paper towels, set aside. 
Fill a large saucepan or cast iron skillet with about an inch of oil and heat over stove-top set at medium to medium-high heat until oil reaches 350 degrees on a deep-frying thermometer. Drop tortilla wedges, about 8 at a time (they should fit in a single layer) in hot oil and cook until bottoms are golden then using metal tongs, flip and cook opposite side and cook until golden. Transfer fried chips to paper towel lined baking sheet then immediately and generously sprinkle with cinnamon sugar mixture (or the sugar won't stick). Best served day prepared.

Recipe Source: apple pie dip adapted slightly from The Pea Kitchen

Kamis, 01 November 2012

Mom's Mashed Potatoes


With Thanksgiving just a few weeks away I'm so excited to start the month off right and be a part of such a fun virtual progressive dinner! So I want to say thank you to Mother Huddle for asking me to be part of such a great event!
Now regarding this recipe, I need to begin by saying, Mom, you were right. Didn't want to admit it but you are. Cooking the potatoes in the smallest amount of water possible yields better results then covering them entirely with water when cooking them. I know we've had our separate opinions on this but I'd have to say I think the "Food Network" may not always be right :). 
I made potatoes on Sunday, covering them entirely with water to cook, as I usually do because that's what I've always seen them do on Food Network and read in the directions of countless recipes, so I just assume that's the right method. If you ask me, there is no right and wrong way of cooking. They are all just opinions, but yes some methods yield better results then others. Well, my Sunday potatoes were much more "water logged" as my mom calls it, than this batch of mashed potatoes I made today cooking them in a smaller amount of water. My mom always said, cooking them in a small amount of water (basically creating a steam bath) will give you better mashed potatoes. I think it's true and it makes sense too. If you cover them entirely with water I think you are basically boiling off many of the starches and flavors and filling them with water. The key is to use just a few cups of water while keeping an eye on the water level as they cook to make sure you water doesn't completely evaporate, or yes they will burn. 
My Grandpa was a potato farmer so I hope my family knows a thing or two about cooking potatoes :). Growing up, we rarely missed a Sunday of meat and potatoes. My mom always made a Sunday roast and served mashed potatoes with gravy alongside it. And as far as instant potatoes go, I didn't even know that they existed until my late teens because my mom didn't believe in them. 
I've adapted what my mom taught me about making mashed potatoes to go along with a few ideas of my own, to create what I believe are the perfect mashed potatoes. This was always one of those recipes of my mom's that was a bit of this and a little of that until the consistency was where she wanted. She didn't ever heat the milk and cream but I like to so the potatoes don't cool off so quickly. I also decided to add the butter first, while mashing and before the liquids are added because it seems to give them a silkier and creamier texture. The butter seems to adhere to the potatoes. These are the potatoes you are going to want to serve this Thanksgiving, covered with that homemade Turkey gravy. I'm telling you my mom has always made the best potatoes! They are amazingly creamy, silky, fluffy and smooth, with just the right amount of richness and an incredibly delicious flavor. They are Heavenly. Enjoy! 


Mom's Mashed Potatoes
Yields about 8 servings

4 lbs Russet Potatoes (about 8 medium potatoes)
1/3 cup butter, melted
1 cup heavy cream
1/2 cup milk, preferably 2% or whole
1/2 cup sour cream
1 tsp salt, then to taste
freshly ground black pepper to taste

Directions:
Peel, rinse and dice potatoes into large chunks (I diced my medium potatoes into 6 pieces total). Fill an 8 quart saucepan with 2 2/3 cups cold water (pan should have about 1/2-inch of water). Add diced potatoes to cold water. Heat potatoes over high heat, stirring occasionally, until water begins to boil. As soon as water begins to boil, reduce heat to medium high and cover pan with lid and cook about 20 - 25 minutes, stirring once halfway through cooking and keeping a close eye on the water level (2 2/3 cups was the perfect amount for me, but if your pan doesn't have a fairly tight fitting lid then a lot of water may evaporate and escape so you may need to add about 1/2 cup more hot tap water to prevent potatoes from burning), until potatoes are very tender when pierced with a fork. During the last few minutes of cooking potatoes, heat heavy cream, milk and sour cream in a small saucepan over medium high heat until very warm, whisking occasionally.
Remove cooked potatoes from heat and strain any excess water from potatoes. Pour strained potatoes into a large mixing bowl. Pour melted butter over potatoes and mash potatoes with a potato masher until smooth, about 2 - 3 minutes (I wouldn't recommend using a wire type potato masher). Pour 3/4 of the very warm cream mixture over mashed potatoes, season with 1 tsp salt and pepper to taste then using and electric hand mixer on low speed blend until well combine (adding more salt as desired). Then increase speed to medium-high speed and whip for about 2 - 3 minutes, adding remaining cream mixture as desired to reach desired consistency (if you like thick mashed potatoes you may not want to add it, and if you like them thin you can add a little more milk to thin as desired), until potatoes are fluffy and smooth. Serve warm topped with gravy or butter if desired.


Continue on to Suzanne's at You Made That?

What's Cooking With Ruthie
Six Sister's Stuff The Mother Huddle
Inside BruCrew Life
Cooking Classy
You Made That?
A Pretty Life in the Suburbs
The Sisters Cafe
Jamie Cooks it Up

It wouldn't be a party without a door prize now would it?  Using the rafflecopter below put your name in the "hat" for a $200 gift card to 1 store of your choice: Target, Kroger, or Walmart - to cover your Thanksgiving dinner.  That's right, we're going to pay for someone's Thanksgiving dinner! To enter just pin this page to Pinterest.  For a couple more entries you can follow the new Pinterest board Simple And Delicious Weeknight Meals, and follow the newSimple and Delicious Weeknight Meals Facebook Page.  Won't these be handy for the busy Holiday weeknights?

Open to US Residents only. See terms for alternate entry. Winner will be notified by email on November 10, 2012.


a Rafflecopter giveaway

Jumat, 12 Oktober 2012

Pumpkin Chocolate Chip Cookies


So maybe I'm a pumpkin addict. What a strange thing to be addicted to =). I love it! Hate it plain but love it in baked goods. Is there anyone out there that eats it plain by the spoonful? Ugh. Horrifying. That would be like eating canned beets! No no, not that bad. There's nothing worse than canned beets. I tasted a bit of plain pumpkin puree when I was making these and it tasted like a spoonful of mushy, far too healthy to be good for you, baby food. Maybe if you were to jazz it up with some sort of spices and lots of butter than maybe, just maybe. Add a little sugar in there and I'll eat it for sure. Not sure why I'm talking about that... so, onto the cookies! I love love LOVE Pumpkin Chocolate Chip Cookies. I don't know how you could not love the sweet, delicious little pillows of baked pumpkin-y goodness. 
I found this recipe over at allrecipes.com. I created my own adaptation, because really how do I stick to a recipe? I love to put my own spin on things. I used less cinnamon, added nutmeg and ginger. Reduced the vanilla because isn't the highlight the pumpkin flavor? I added molasses because it's the perfect compliment to pumpkin (brown sugar may give the same effect but it just seems heavy to me and I wanted a fluffy cookie, so I went with the combo of all granulated sugar plus molasses). I added a little red food coloring so they wouldn't look so  dull and drab (but of course you can leave it out if you'd like). I omitted the milk because I don't think it's necessary, I could be totally wrong though. Then lastly I used less chocolate chips, again so they wouldn't overpower the pumpkin flavor. I also used a combination of half milk chocolate and half semi sweet. I guess you could say I almost changed the entire recipe =), I kept the base ingredients the same though. I'm sure it's a great recipe as it's originally listed but like I said I just like to make a few changes. Enjoy these cake-y soft, sweetly spiced, perfectly moist Fall inspired cookies!


Pumpkin Chocolate Chip Cookies
Yields 2 1/2 dozen

Ingredients:
2 cups all-purpose flour
2 tsp baking powder
1 tsp baking soda
1 1/2 tsp ground cinnamon
1/2 tsp ground nutmeg
1/4 tsp ground ginger
1/2 tsp salt
1 cup canned pumpkin puree
1 cup granulated sugar
1/2 cup vegetable oil
1 large egg
2 tsp molasses
1 tsp vanilla extract
4 drops red food coloring (optional)
3/4 cup semi-sweet chocolate chips
3/4 cup milk chocolate chips

Directions:
Preheat oven to 350 degrees. In a mixing bowl, whisk together flour, baking powder, baking soda, cinnamon, nutmeg, ginger and salt, set aside. In the bowl of an electric stand mixer, combine pumpkin puree, granulated sugar, vegetable oil, egg, molasses, vanilla and optional food coloring. Blend mixture until combine. With mixer on low speed, slowly add in flour mixture and mix just until combine, scraping down the sides of the bowl as needed. With a rubber spatula, fold in chocolate chips. Drop dough 2 Tbsp at a time (try to pile them high for less spreading - therefor a thicker cookie) onto Silpat lined or greased baking sheets and baking in preheated oven 12 - 14 minutes until cookies are golden brown and nearly set. Allow to cool several minutes before transferring to a wire rack to cool completely. Store in a single layer in an airtight container (some people prefer them cold so you can also store them in the refrigerator if you'd like).

Recipe Source: adapted slightly from allrecipes.com

Jumat, 21 September 2012

Ultimate Caramel Apples - A Favorite Fall Treat


I know I've already posted these caramel apples, but since I've been doing this food blog nearly a year I've learned a few tricks about food photography so I just wanted to share some new photos. Plus these are one of my favorite treats so I figured I may as well share them again for those of you that weren't following along last year to see them.
 I've made these caramel apples countless times and everyone always loves them. I mean who doesn't love a delicious, chewy, generously coated in caramel, chocolate covered, sprinkled with tasty toppings caramel apple? To take one bite is simply pure bliss. The chewy bite, the perfect texture and buttery stretch of the homemade caramel, ahhh. Words or pictures don't do them justice.
I like to make them pretty and fancy, but if you want you can just dip and coat the entire apple with caramel. I just love having that vibrant beautiful green show through though. The natural color of fruit is just gorgeous, so why hide it? This recipe is a bit time consuming but I'm telling you it is so worth it! Once you have these you wont want to let a Fall season go by without them. If you don't want to take the time to coat them with the chocolate and toppings then these really are amazing with caramel alone. The homemade caramel makes all the difference in a great caramel apple. It turns an ordinary caramel apple into a fancy, gourmet caramel apple. These make a great gift to give friends or loved ones. I just took them to friends and told them, Happy Fall! Who needs a holiday to celebrate =). I love Fall.
Also note that a candy thermometer is a MUST with this recipe. The caramel needs to be heated to exactly 239 degrees or it will either be too runny or too hard. If you don't have one it's worth the investment. You can pick one up at a local supermarket for about $10 - $15. I use mine all the time. Enjoy!


Caramel Apples
Yields 10

Ingredients:
10 small Granny Smith Apples
1 recipe Homemade Caramel, recipes follows
12 oz. milk chocolate or white chocolate chips*
Assorted toppings for coating, see list below
10 craft sticks or twigs

Directions:
Insert 1 craft stick vertically through the center of each apple, set apples aside. Butter two 13x9 pans, and make enough space in the refrigerator for them to sit evenly. 
Prepare Homemade Caramel as directed and allow to cool about 10 - 13 minutes then immediately dip apples in caramel (note: from my experience this caramel doesn't reheat well, so with that said you basically get one chance to dip so don't let the caramel cool too long and work quickly when dipping, you may even want to have a friend help to be able work quicker). If you want to make yours to look like the ones pictured (with the apple showing through the center on top) then tilt apple when dipping and don't fully immerse apple in the caramel, then carefully swirl the apple to coat all edges. Lift apple and let some of the excess caramel drip off and run the bottom of the apple along the inside edge of the pan. Tilt apple upside down and swirl just until the caramel is about to run off, then immediately turn upright and transfer to buttered baking dish in refrigerator. Repeat process with remaining apples, be sure to space them a bit apart on baking dish so they don't stick together. Allow caramel coated apples to set in refrigerator.
Heat chocolate chips in a microwave safe bowl on 50% power, in 30 second intervals stirring after each interval until melted and smooth. Using an icing spatula or butter knife, coat edges with melted chocolate and immediately sprinkle with desired toppings. Return to refrigerator to allow chocolate to set. Serve at room temperature and store in the refrigerator in airtight containers or Ziploc bags.

*Blocks of chocolate can also be used, just chop into small, uniform pieces to ensure even melting. Also, I highly recommend using quality chocolate (chips or blocks) such as Guittard, Ghirardelli or Godiva (any of the G's =). The lower quality chips don't melt as well and tend leave that dull residue when they set.

Homemade Caramel

Ingredients:
1 cup butter
2 cups granulated sugar
1 1/2 cups corn syrup
2 cups heavy cream
1 tsp vanilla extract

Directions:
In a large enameled cast iron pot, combine butter, sugar, corn syrup and 1 cup heavy cream. Heat mixture to a boil just over medium heat (the 6 of an electric stove), stirring frequently. Once mixture has reached a boil, stir in remaining one cup heavy cream. Then without stirring,(again just slightly over medium heat) bring mixture to exactly 239 degrees then immediately remove from heat (this should take around 20 - 25 minutes). Carefully pour caramel into a medium nonstick saucepan and stir in vanilla (transferring caramel to another pan helps it cool faster and will leave behind some of the little brown specs at the bottom of the cast iron pan. You don't have to transfer it but if you don't just allow the caramel to cool a little longer than the 10 minutes). Allow to cool 10 minutes before dipping apples.

Coating Ideas

To crush, place ingredients in a ziploc bag, seal and crush with a rolling pin. I probably make these too much because I've started naming them =). When I listed the white or milk chocolate chips I'm referring the which type of melted chocolate to coat them with.
  • Crushed Oreos with white chocolate chips - Cookies and Cream 
  • Crushed Oreos with milk chocolate chips - Cookie Fudge 
  • Crushed Butterfingers - Candy Bar Apple
  • Chopped nuts, such as pecans, almonds or peanuts - Nutty
  • Sliced or chopped almonds and poppy seeds with white chocolate - Almond Poppyseed 
  • Chopped dried cranberries & chopped walnuts or pecans with white chocolate chips - Christmas Apple
  • Sprinkles - Every Kids Favorite
  • Crushed graham crackers or graham cracker pie crust & a little cinnamon & nutmeg with white chocolate chips - Apple Pie
  • Crushed sugar cones or waffle cones with white chocolate chips - Ice Cream Apple
  • Chopped mini marshmallows & optional chopped nuts with milk chocolate chips - Rocky Road
  • Crushed pretzels - Salted Caramel
  • Crushed shortbread with milk chocolate chips - The Twix 
  • Crushed lavender & vanilla bean with white chocolate chips - The Gourmet
...or whatever else you can come up with.

Recipe Source: Caramel Apples - Cooking Classy, Homemade Caramel - adapted from allrecipes.com


Jumat, 14 September 2012

Pumpkin Pie Dip (A 5 Minute Recipe)


Some of you may be thinking, what is with this girl? Does she only eat pumpkin? I know I've posted a lot of pumpkin recipes lately, but it's just that time of year =). Also the other reason, I always buy the huge can of pumpkin puree because I can get it for the price of what the small can costs. So why would I buy the small can? It just wouldn't make sense. I hate wasting though, so I buy the large can and then I can get two, sometimes even three different pumpkin recipes out of it (unless of course I'm making pumpkin pie). 
I saw this Pumpkin Pie Dip floating around Pinterest so I thought, ooh yes I must try that! I liked that this recipe didn't use cool whip as some of the pumpkin pie dips do. I changed a few things from the original recipe. I thought it needed a little more pumpkin flavor so I added an additional 1/4 cup pumpkin puree (to the 1 cup listed).  I omitted the pumpkin pie spice and rather just increased the cinnamon, added nutmeg and cloves then left the ginger as listed, then I added a little caramel sauce of course. I love pumpkin and caramel. I love anything with caramel. 
This simple 5 minute dip is has just the right amount of sweet and spice, it's fluffy, creamy and yes even dreamy. Basically it's pure goodness. It tastes so much like pumpkin pie (different texture obviously, but same amazing flavor). So when you want a quick dessert with all the flavors of pumpkin pie that everyone will love, then this is definitely what you'll want to make. You'll quickly lose track of just how much you've actually eaten. Enjoy and Happy Fall!


Pumpkin Pie Dip
Yields about 4 cups

Ingredients:
8 oz cream cheese, softened
2 cups powdered sugar
1 1/4 cups canned pumpkin
1/2 cup sour cream
1 1/2 tsp cinnamon
1/2 tsp nutmeg
1/2 tsp ginger
1/4 tsp cloves (optional)
1/4 - 1/2 cup caramel sauce, store bought or homemade (optional, but highly recommended)
graham crackers, chocolate crackers or gingersnap cookies for servings

Directions:
In a large mixing bowl, using an electric hand mixer on low speed, blend together cream cheese and powdered sugar until combine, then increase mixer to medium and beat for 1 minute until smooth and fluffy. Add in pumpkin, sour cream, cinnamon, nutmeg, ginger and cloves and mix until well blended and fluffy, about 1 - 2 minutes. Drizzle with optional caramel sauce (and marble if desired), serve with crackers. Store in refrigerator in an airtight container.

Tip: for cleaner edges on your graham crackers, simply cut them along indentations with a sharp knife rather than breaking them into individual pieces.

Recipe Source: adapted from Taste of Home

Rabu, 12 September 2012

Mini Pumpkin Cupcakes with Cream Cheese Frosting


Wahoo! Time for the holidays... er... I mean next month, time for the holidays! My favorite time of year is the holidays. Why? All the food of course =)! That's why I'm getting way ahead of myself. I can't help it though, I saw these little candy pumpkins at the store the other day and thought, Oh I've just got to bake something with these. I bought a big bag then hid some up in the cupboard but somehow my family managed to sniff them out. I guess the baking cupboard is a given, everyone knows I've got a huge stash of goodies up there =). Luckily there were just enough left to make the perfect cupcake toppers for these delicious, bite size, Mini Pumpkin Cupcakes. 
For this recipe, I basically combined my Pumpkin Bars recipe with the cupcake portion of my Pumpkin Cupcakes with Chocolate Ganache and Spiced Cream Cheese Frosting (one of my favorite cupcakes). These cute mini cupcakes pack a lot of sweetness, moisture, flavor and pumpkin-y goodness into one little bite. They would be perfect for a Halloween party or for Thanksgiving of course. You can't have Thanksgiving without some kind of pumpkin dessert, right? Or you can make them and eat them for breakfast like my kids did, when they aren't frosted they are basically a fluffy pumpkin muffin so I figured why not =). 
Enjoy and share, because these are the perfect sharing size!


Mini Pumpkin Cupcakes
Yields about 3 1/2 dozen (I got 43) - recipe can easily be doubled

Ingredients:
1 cup all-purpose flour
1 tsp baking powder
1/2 tsp baking soda
1/4 tsp salt
1 tsp cinnamon
1/4 tsp nutmeg
1/4 tsp ginger
1/2 cup packed light-brown sugar
1/3 cup granulated sugar
1/3 cup butter, melted and whisked to cool slightly
1/3 cup applesauce, at room temperature
1 large egg
1 large egg yolk
1 tsp vanilla extract
3/4 cup + 2 Tbsp canned pumpkin puree
2 1/2 Tbsp buttermilk
1 recipe Cream Cheese Frosting, recipe follows
44 pumpkin candies, optional

Directions:
Preheat oven to 350 degrees. In a mixing bowl, whisk together flour, baking powder, baking soda, salt, cinnamon, nutmeg and ginger, set aside. In a separate large mixing bowl, using and electric hand mixer on low speed, blend together light-brown sugar, granulated sugar, butter and applesauce until well combine and smooth, about 1 minute. Mix in egg, egg yolk and vanilla. Add pumpkin puree and buttermilk and mix until well blended. Slowly add dry ingredients and mix just until combine. Fill paper lined mini muffin cups 2/3 full (about 1 slightly heaping Tbsp in each) and bake in preheated oven 12 - 14 minutes until toothpick inserted into the center of cupcake comes out clean. Allow to cool completely then frost with Cream Cheese Frosting and optionally top each cupcake with a pumpkin candy. Store in an airtight container.

Note: I would recommend serving these within an hour or two of topping them if you are adding the pumpkin candy because after that the frosting will begin to break the candy down. I would also recommend storing them in the refrigerator (if not enjoying within a few hours) in an airtight container and then let them rest at room temperature before serving.

Cream Cheese Frosting

Ingredients:
4 oz. cream cheese, softenend
1/4 cup butter, softened
2 cups powdered sugar
1/2 tsp vanilla extract

Directions:
Combine cream cheese and butter in a mixing bowl and using an electric hand mixer on medium speed, blend together until light and fluffy. Add in powdered sugar and vanilla and blend on low speed until combine, then increase to medium and whip until smooth and fluffy.

Recipe Source: Cooking Classy 

Jumat, 31 Agustus 2012

Pumpkin Pie Oatmeal with Caramel Sauce


What do you get when you combine oats, pumpkin, caramel, and walnuts along with some sweet spices? You get a nutritious and incredible breakfast with three, yes three Superfoods (some may say four if you count the cinnamon)! And the best part, it tastes like pie. I will admit there is quite a bit of sugar in this recipe but if it didn't have it just wouldn't be near as good. At least it has a lot less than the real thing =). 
Many of us are always labeling recipes with "Christmas morning breakfast," well what about Thanksgiving or even Halloween breakfast? The other holidays should have their own fancy breakfasts too, and I think this would make the perfect fit. 
Indulge a little and be sure to get a drizzling of the caramel sauce with every bite. In my opinion a pumpkin pie shouldn't be left without some kind of caramel sauce or dulce de leche, to me they are just meant to go together. That's why I would say don't omit the caramel sauce, it's a must. It's the highlight of this recipe. Enjoy and indulge in the flavors of fall!


 ...like I said, every bite needs a little bit of caramel sauce

Pumpkin Pie Oatmeal with Caramel Sauce
Yields 1 serving

Ingredients:
1/2 cup rolled oats
2/3 cup milk
1/4 cup buttermilk*
1/4 cup canned pumpkin puree
1 Tbsp light-brown sugar
1/4 tsp cinnamon 
1 pinch nutmeg
1 pinch ginger
1 dash salt
1 - 2 Tbsp caramel sauce or caramel ice cream topping
1 Tbsp chopped walnuts or pecans, optional

Directions:
In a large microwave safe bowl, whisk together oats, milk, buttermilk, pumpkin puree, light-brown sugar, cinnamon, nutmeg, ginger and salt. Microwave mixture on HIGH power for 3 1/2 minutes, then allow oatmeal to rest a few minutes (for a thinner consistency, if desired, pour in additional milk or you could use half and half). Drizzle oatmeal with caramel sauce and sprinkle with optional chopped nuts. Serve warm.

*or an additional 1/4 cup milk plus 3/4 tsp lemon juice

Recipe Source: Cooking Classy