Rabu, 30 Mei 2012

Slow Cooker Chicken Teriyaki


Slow cooker meals, aren't they just amazing? Throw the food in, say goodbye, then several hours later say hello to dinner. It really doesn't get much easier. I saw this photo/recipe on foodgawker.com and new I had to try it. I think I've finally realized another reason I love slow cooker meals, because I always have dessert after dinner so if I'm making dessert it's nice to have a simple dinner to throw together. Also, I can never get over how tender and flavorful the meat is that's been slowly simmered all day in the slow cooker. 
You will noticed if you follow the link that the recipe is nearly entirely different, yes I will admit rarely do I ever stick to someone else's recipe. It's just too fun to add my own twist. Feel free to try it either way I'm sure the original rendition is amazing too. Enjoy!


Slow Cooker Chicken Teriyaki
Yields 4-6 servings

Ingredients:
3 lbs boneless skinless chicken breasts
3/4 cup low sodium soy sauce (regular would work too)
1/4 cup + 2 Tbsp apple cider vinegar
1/3 cup packed light-brown sugar
1/4 cup honey
3 Tbsp orange marmalade
1 tbsp finely grated fresh ginger
2 cloves garlic, finely minced
1/2 tsp freshly ground black pepper
1 1/2 Tbsp cold water
1 1/2 Tbsp cornstarch
Cooked long grain white rice, for serving
Sesame seeds, for garnish (optional)

Directions:
Place chicken in a slow cooker, set aside. In a mixing bowl, whisk together soy sauce, apple cider vinegar, light-brown sugar, honey, orange marmalade, ginger, garlic and pepper. Pour mixture over chicken in slow cooker, cover with lid and cook on low heat 5 - 6 hours. Remove chicken from slow cooker and shred. Strain sauce from slow cooker through a fine mesh strainer into a medium saucepan. In a small mixing bowl whisk together 1 1/2 Tbsp cold water and cornstarch. Pour cornstarch mixture into liquid in saucepan and heat mixture over medium high heat, stirring constantly, until mixture begins to gently boil. Allow mixture to gently boil about 20 seconds until thickened. Return chicken to slow cooker and pour teriyaki sauce from saucepan over chicken. Toss mixture gently to evenly coat. Serve warm over cooked rice garnished with optional sesame seeds and serve with diced fresh pineapple if desired.

Recipe Source: slightly adapted from Lake Lure Cottage Kitchen


Selasa, 29 Mei 2012

Perfect Breakfast Potatoes


If you've been following my blog you've probably noticed by now breakfast is kind of my thang. I love a delicious breakfast meal served up any time of day. I mentioned before how I've posted all these main entrees for breakfast but I've never posted the sides I serve with them. 
I've been making these potatoes for many years, so I'd hope I can say I've perfected the recipe. I've tried different cooking methods, different oils, played with seasonings and now here are the exact results I was looking for. Perfectly tender interior, with a gorgeously browned exterior, slightly moist, with just the right amount of flavor and seasoning. You can use plain old salt and pepper (if you want to be boring =) or you can add some pizzazz with the delicious seasoning blend listed. Below are a few things I wanted to list, that in my opinion, make the perfect breakfast potatoes:


1. Pre-bake the potatoes. If they are cooked halfway before you fry them then they don't end up under cooked in the middle.
7. Leave the skins on when dicing. Less work (no peeling necessary), more taste and more vitamins. With that said why wouldn't you?
2. Extra Virgin Olive Oil was my favorite oil for frying. I've tried butter, bacon fat and vegetable oil and EVOO is where it's at. Not only do the potatoes taste better fried with EVOO but they are much better for you.
3. Season generously. I'm not saying over salt your potatoes, I'm saying a little flavor goes a long way. I love the flavors that garlic and onion powder add to these. Alternately if you love Potatoes O'Brian you could add diced onion, and diced green and red bell pepper.
4. Cover potatoes with a lid while frying, this helps the potatoes maintain some of the moisture as well as helping them evenly cook through.
5. Don't over-stir. If you stir too often you won't get the perfectly golden edges. Just think of flipping a pancake, you don't want to flip it before it's golden, it's the same with breakfast potatoes, you shouldn't "flip" them until they are golden.
6. Serve immediately. Potatoes get soggy after sitting too long after cooking. It's a silly thing but I always get frustrated when people are late for a breakfast meal I'm serving. Breakfast meals/sides aren't nearly as good cold or reheated. This includes breakfast potatoes.


All the above are my personal opinion. I'm not a professional chef (just wannabe =). They are tips I've found through personal experience through trial and error. I hope you love these potatoes and maybe even make them as often as I do (I make them at least once a week, sometimes even three).


Breakfast Potatoes
Yields about 5 servings 


Ingredients:
5 small Russet Potatoes (total weight should be about 1.5 lbs)
1/4 cup Extra Virgin Olive Oil 
1 1/2 - 2 tsp Herb Seasoning, to taste (recipe can be found here)


Directions:
Preheat oven to 400 degrees. Meanwhile rinse and scrub potatoes then pierce each potato several times with a fork. Bake potatoes in preheat oven for 35 minutes. Remove from oven, allow to cool 30 minutes then chill overnight (alternately you could dice and cook potatoes immediately, I've just found it's more convenient to bake them ahead of time when I'm already making baked potatoes for dinner or baking another dish. Also, potatoes seem to cut cleaner if they've been chilled). 
Dice chilled potatoes into 1/2" cubes. Pour extra virgin olive oil into a 10" non-stick skillet and heat over medium high heat. Once oil barely begins to smoke, carefully pour diced potatoes into hot oil. Immediately sprinkle with Herb Seasoning then toss potatoes with a heat proof spatula. Cover pan with lid and cook potatoes, stirring every few minutes as they begin to lightly brown on bottom, about 8 - 12 minutes until potatoes have reached desired tenderness. Serve immediately. 
Note: sometimes I like to sprinkle them with a few tablespoons of Parmesan cheese after frying (cheese is good over nearly everything). Also, they are delish drizzled with ketchup, yep I'm all American with my side of Ketchup =). It's like french fries without ketchup, it just shouldn't be done.

Senin, 28 Mei 2012

Crusty Rustic Bread (it's no knead!)


Everyone reading this, please, you need to make this bread! I'm telling you, this is the best loaf of yeasted bread I have ever made! I've baked many o' things, but funny thing until today I've never made my own loaf of no knead rustic bread. Seriously, why I have not tried it until now I can never tell you! I had no idea that such an incredibly quick and easy recipe could yield such amazing results. It is the perfect loaf of rustic bread, wonderfully crisp and chewy on the outside, while tender and even slightly moist on the inside. I can now officially say I've made a loaf of bread as good as a professional artisan bread baker thanks to the wonderful post over at Simply So GoodI'm so happy I found this recipe (from my countless hours of Pinterest gawking. Seriously I could spend my whole day on there, it's dangerous). Never again will I pay $5 to buy a loaf of rustic bread at the store or bakery. Astoundingly I liked this even better and it had to cost less than .50 cents to make. 
I also can't wait to try many different variations on this simple recipe. Thank you thank you to Simply So Good for posting such an amazing recipe. Head over there for step by step photos, mix in ideas and to browse through the over 1,000 comments posted (when I saw there were over 1,000 comments I knew this recipe had to be good). I hope this recipe becomes a staple in your home too!


Crusty Rustic Bread
Yields 1 loaf

Ingredients:
3 cups all-purpose flour
1 3/4 tsp salt
1/2 tsp active dry yeast
1 1/2 cups warm water (about 110 degrees)

Directions:
In a large mixing bowl, whisk together flour, salt and yeast. Pour in warm water and stir mixture with a wooden spoon until a shaggy ball forms. Cover bowl with plastic wrap and allow to rise for 12 - 18 hours (on the counter at room temperature).
Heat oven to 450 degrees. Once oven has reached 450 degrees, place a cast iron pot covered with lid into preheated oven, heat pot for 30 minutes. 
Meanwhile, turn dough out onto a heavily floured surface then shape dough into a ball. Cover dough with plastic wrap and allow to rest while pot is heating. Remove pot from oven and with floured hands, carefully drop dough into hot pot (you DON'T need to grease the pot) cover with lid, then immediately return pot to oven and bake 30 minutes (at 450 degrees). After 30 minutes, remove lid from pot and bake uncovered for 15 minutes. Remove from oven and allow bread to cool on a cooling rack. Once completely cooled, bread stores well in an open paper bag (it helps the bread maintain it's crisp crust. I wouldn't recommend storing it in an airtight container or ziploc bag).


Update 7/3/11: 
I made a wheat version of this with 1 1/2 cups whole wheat flour, 1 1/2 cups bread flour, 1 tsp salt, 1/2 tsp yeast, 2 Tbsp honey combine with 1 1/2 cups + 1/3 cup warm water and rise and cook according to directions listed. It was delicious!

Recipe Source: adapted from Simply So Good, thank you for such an incredible post!

Jumat, 25 Mei 2012

Chocolate Chip Cookie Dough Bites


Oh I don't even know where to start with these bad boys! This is one of my favorite posts yet! I had family over today and served these for dessert, I think they went quicker than any dessert I've ever made. Who doesn't love cookie dough? Okay okay so truthfully I wasn't that into it (what was wrong with me!? =) until just a few months ago, then I got a more refined palate and became obsessed with it, and now with these I'm dangerously addicted. I can't stop eating them!
Of course I made these to be egg free, and to replace the moisture from the lack of eggs (I also didn't want to add more than a stick of butter) I decided to add what better than heavy cream! My life motto: every things better with cream haha kidding (kind of). If it wasn't so fattening I'd pour cream over my cold cereal replacing milk for breakfast, I love the stuff. The cream gives these cookie dough bites the perfect texture. Ah don't you just wish you had one now to sink your teeth into and let it slowly melt in your mouth? So go make them, you won't regret it (well maybe you will a little when you can't stop eating them... but it's worth it. I'd rather run a few extra miles to enjoy a few more of these).
Make these and where ever you take them they will be worth more than gold, seriously they should replace money. Bonus, less waiting for baked cookies and less mess. I'm going to be seeing a lot of these around my place.
Note: I know many cookie dough truffles/bites use mini chocolate chips but I never keep the minis on hand that's why I used regular chocolate chips and just chopped them up a bit. Plus I love how it gave them the little slivers of chocolate throughout the cookie dough bites, but if you don't want to do the chopping and you have minis feel free to use that. You could even use mini M&M's. I listed in the recipe my personal preference which is half milk chocolate chips half semi-sweet but if you prefer one over the other then use that. Add extra if you'd like too. Enjoy! Hide them from everyone, I think next time I'm going to. Sometimes, just sometimes it's okay to be greedy =).


Creepy, do you see the little guy looking up saying "eat me"?
 Now I can't stop looking at it...
 That serving will be mine...


Chocolate Chip Cookie Dough Bites
Yields about 30 (so barely enough for 2 people =)


Ingredients:
1/2 cup salted butter, softened
3/4 cup packed light-brown sugar
1/3 cup granulated sugar*
1/4 tsp salt
3 Tbsp heavy cream
1 tsp vanilla extract
1 1/2 cups all-purpose flour
1/4 cup milk chocolate chips, chopped (the idea is to get them to be about 1/2 - 1/3 their original size)
1/4 cup semi-sweet chocolate chips, chopped


Optional Topping:
1/3 cup semi-sweet chocolate chips


Directions:
In the bowl of an electric mixer, whip together butter, brown sugar, granulated sugar and salt until pale and fluffy about 3 - 4 minutes. Stir in cream and vanilla extract. Add in flour and mix just until combine (dough will seem dry at first but it will come together). Mix in chopped chocolate chips. Scoop dough out 1 equal tablespoon at a time and roll into balls. Place on parchment or wax paper. If drizzling with chocolate, place 1/3 cup semi-sweet chocolate chips in a microwave safe container and microwave on 50% power in 30 second intervals, stirring after each interval until melted and smooth. Pour melted chocolate into a small ziploc bag, seal bag and cut a very small tip off the corner of the bag. Drizzle chocolate over tops of truffles. Place truffles in freezer for several minutes until chocolate sets and hardens (mine only took about 3 minutes), then enjoy! For more firm cookie dough bites, chill 1 hour in refrigerator. Store in refrigerator in an airtight container.


*for an even creamier truffle omit 2 Tbsp of the granulated sugar and replace it with 2 Tbsp coffee creamer powder. It's delicious!


Recipe Source: Cooking Classy

Rabu, 23 Mei 2012

My Idea of the Perfect Scrambled Eggs


After posting banana bread pancakes the other day I realized I haven't even posted the sides I always serve with my breakfast entrees. Well it's about time I do. Most often I serve the the entree with a side of these scrambled eggs and breakfast potatoes, then on special occasions with bacon. 
This is one of those recipes I had to actually had to sit down and measure out what I put in it because it's always been a little of this and a dash of that. I believe one of the most important factors to perfect, fluffy scrambled eggs it stirring/folding them constantly. Every cook has their opinion on what temperature they should be cooked at, some say low and slow and other say high and quick. In my opinion medium - high is perfect. 
The seasoning used for these is one I've been using a lot lately, most often in breakfast dishes. I think I would say it's slightly Italian. It compliments eggs perfectly. You can use the remaining seasoning for burgers or chicken. It's a quick, simple way to add delicious flavor. Enjoy!


Scrambled Eggs
Yields about 4 servings


Ingredients:
8 large eggs
1/2 cup milk*
1/2 Tbsp butter
2 oz grated Cheddar or Monterrey Jack cheese (I use 1 oz of each)
1 Tbsp grated Parmesan cheese
1 tsp herb seasoning, recipe follows or salt and pepper to taste


Directions:
Preheat a 10" non-stick skillet over medium high heat. Crack eggs into a blender, add in milk  (cover with lid) and blend mixture on low speed for 10 seconds. Melt butter in saucepan by spreading it along bottom and edges of skillet. Once butter has lightly begun to bubble, pour blended egg mixture into pan and immediately sprinkle with cheeses and seasoning. Stir eggs CONSTANTLY (a key to perfect eggs) with a spatula, making sure to scrape along the surface of the pan to prevent bottom from browning and a skin from forming. Cook eggs for 3-4 minutes to desired wetness/dryness of eggs (note: they will continue to cook slightly once removed). Remove from heat and serve immediately.


*sometimes I like to do 1/4 cup milk and 1/4 cup buttermilk


Add in ideas:
Diced ham
Fresh salsa (reduce amount of milk if adding this)
Sliced mushrooms
Diced tomatoes
Spinach
Diced avocados
Crumbled bacon


Herb Seasoning


Ingredients:
1 Tbsp salt
1 1/2 tsp freshly ground black pepper (call it your workout for the day)
2 tsp onion powder
2 tsp garlic powder
1 tsp dried parsley
1/4 tsp dried oregano
1/8 tsp dried basil
1/8 tsp dried thyme


Directions:
Whisk together all ingredients in a mixing bowl. Store in an airtight container for up to several months. This seasoning is also great for burgers, chicken, twice baked potatoes and breakfast potatoes.

Selasa, 22 Mei 2012

The Best Chocolate Cake You Ever Ate


Ahh chocolate cake, doesn't it just make life good? And what makes life really good? A moist, lightly fudgy, perfectly chocolaty, slightly dense, kissed with cinnamon piece of the perfect chocolate cake frosted in a rich, fudge-like frosting. Haha I'm kidding, kind of. I know if someone were to hand me a piece of this cake on "one of those days" it would rapidly change from being "one of those days" into being a fabulous day =).
I got this recipe from my sister, whom got it from allrecipes. I'm quite certain it's a recipe for chocolate cake that cannot be topped. There's not outdoing this one. It is simply as it's named "The Best Chocolate Cake You Ever Ate." I may call it The Best Chocolate Cake You Will Ever Eat, because it's likely to be a lifelong favorite. Everything about this cake is divine. I made several of my own adjustments to the recipe, just follow the allrecipes link above to view the original recipe. 
I almost forgot to mention the best part of this recipe (after it's incredible taste of course), you frost it right out of the oven while it's hot. No waiting an hour for the cake to cool to frost it! Amazing no? Just one more reason this is truly the perfect chocolate cake.


The Best Chocolate Cake You Ever Ate
Yields about 16 servings

Ingredients:
2 cups all-purpose flour
2 cups granulated sugar
1 tsp baking soda
3/4 tsp salt
1/2 tsp cinnamon
1/2 cup butter
1/2 cup applesauce 
1/3 cup cocoa powder
1 cup water
1/2 cup buttermilk
2 large eggs
2 tsp vanilla extract
1 Recipe Chocolate Fudge Frosting, recipe follows

Directions:
Preheat oven to 375. In a large mixing bowl, whisk together flour, sugar, baking soda, salt and cinnamon, set aside. Melt butter in a saucepan then stir in applesauce, cocoa powder and water and bring mixture just to a boil, whisking constantly. Pour hot butter mixture into flour mixture and stir. Add in buttermilk, eggs and vanilla and whisk mixture until well combine. Pour mixture into a buttered 13x9 baking dish and bake 25-28 minutes until toothpick inserted in center comes out with a few moist crumbs attached, prepare frosting during the last 5 minutes of cake baking. Immediately after removing cake from oven, pour (or dollop frosting by the spoonfuls) over hot cake and gently spread over entire cake.

Chocolate Fudge Frosting

Ingredients:
1/2 cup butter
1/4 cup cocoa powder
1/4 cup milk
4 cups powdered sugar
1 tsp vanilla extract

Directions:
In a medium saucepan, combine butter and cocoa powder and bring mixture just to a boil, stirring constantly to break up cocoa powder. Remove from heat and stir in milk, powdered sugar and vanilla and mix until well combine. If mixture is too thick to stir by hand beat it with an electric hand mixer on low speed until well blended.  Immediately spread over hot cake before frosting begins to set. (Also, note if you are adding sprinkles the frosting does begin to set quickly so you will want to garnish with sprinkles immediately or they don't stick well).

Recipe Source: adapted slightly from allrecipes


Sabtu, 19 Mei 2012

Cookies and Cream Chex Mix


Don't worry people, yes Cookies and Cream Chex Mix was a limited edition (Dear General Mills, why would you make the best Chex Mix you've ever created a limited edition?) but the good news, I've figured out how to make them at home! And it's so easy and think they are even better (everything fresh home-made is better isn't it?). Also, I never thought I'd say it but these are even better than muddy buddies! I could eat the whole batch on my own. It takes 4 ingredients and they can honestly be made in under 5 minutes! I made these twice in the last two days (yeah they are that good), the second time around I did an equal ratio powdered sugar to Oreo and it was perfect. I ate these while eating cookies and cream ice cream and I think I may just like these more, that is SERIOUSLY saying something! How could one of my easiest recipes be one of my favorite =)? Sometimes the simplest things are the best. Warning: the following recipe is highly addictive, prepare at your own risk.


Cookies and Cream Chex Mix

Ingredients:
6 cups Corn Chex Cereal
1/2 cup very finely crushed Oreos (8 original Oreos)*
1/2 cup powdered sugar
1 (12 oz) bag Vanilla Candy Melts, such as Wilton

Directions:
Measure 6 cups Corn Chex Cereal into a large mixing bowl, set aside. Pour crushed Oreos and powdered sugar into a large ziploc bag, seal bag and shake to combine mixture, set aside. In a microwave safe bowl, melt Vanilla candy melts in 30 second intervals, stirring after each interval until melted and smooth. Pour melted candy melts over Corn Chex and toss mixture with a rubber spatula until evenly coated (scrapping down the sides of the bowl as stirring, don't waste any of that melted candy). Pour or scoop coated Corn Chex into ziploc bag containing crushed Oreo mixture. Seal bag and shake until the cereal is evenly coated. Store in an airtight container up to one week (but don't kid yourself they won't be around for a week =).

*when I say very finely crushed I mean very finely crushed, as in nearly powder. It's the larger clumps that will tend not to stick the the coated cereal.

Recipe Source: Cooking Classy


Jumat, 18 Mei 2012

My Secret Ingredient Brownies


My latest obsession... BROWNIES! I go through phases of dessert cravings lately, you'd think I was pregnant or something. A few weeks ago it was ice cream for a few weeks, then I moved on to cookie dough and now it's brownies. I'm in love with them, I can't stop thinking about them. I've been stopping by a local bakery way too often this past week to get one of their delicious brownies. I decided I needed to create my own brownie recipe at home rather than getting them from the bakery so often. Also, I happened to have some left over evaporated milk in the refrigerator I didn't want to just toss out and needed to find a use for it. Brownies + evaporated milk, it was meant to be. Hence the secret ingredient.
This brownie has everything I want in a brownie. Its perfectly chocolaty, chewy, fudgy, dense, tender, sweet, decadent and it has that heavenly, thin, crisp layer on the very top (ahh) and last but not least it's such a convenient recipe using ingredients that you likely always keep on hand. I am a milk chocolate lover but if you are a semi-sweet chocolate lover you may want to increase the cocoa amount to 1/2 cup (and add an extra 1/2 Tbsp oil) rather than using 1/3 cup. 
The perfect brownie needs no upgrades, no added caramel, chocolate chunks, mints, frosting or even powdered sugar, it stands confident all on it's simple own and I'd have to say I think this just may be it! Enjoy!


Secret Ingredient Brownies
Yields 9 - 12 brownies


Ingredients:
1 cup all-purpose flour
1/3 cup cocoa powder
1/2 tsp salt
1/4 cup butter
1/4 cup evaporated milk
1 1/3 cups granulated sugar
3 Tbsp vegetable oil
2 large eggs, cold
1 tsp vanilla extract


Directions:
Preheat oven to 350 degrees. In a mixing bowl, whisk together flour, cocoa and salt until well blended and cocoa clumps have all broken up, set aside. In a small saucepan, melt butter with evaporated milk over medium low heat, stirring occasionally. Remove from heat and allow to cool slightly (I just did this by whisking it for 1 minute, alternately the butter can be melted in microwave with evaporated milk in a microwave safe bowl in 20 second intervals, stirring after each interval until melted). Pour melted butter mixture into a large mixing bowl and whisk in sugar and vegetable oil. Add eggs and vanilla extract and mix until well blended. Add in dry ingredients and mix, using a wooden spoon, until combine. Pour and spread batter evenly into a buttered 8 x 8 baking dish. Bake in preheat oven for 32 - 36 minutes, until toothpick inserted in center comes out with a few moist crumbs attached. Allow to cool for about 15 - 20 minutes before cutting into squares.


Recipe Source: Cooking Classy

Rabu, 16 Mei 2012

Sonoma Chicken Salad Sandwiches


If you like poppy seed salad dressing then this is the chicken salad of your dreams! This chicken salad is amazing and so simple! I was shopping at Sam's Club several weeks ago and taste tested some Sonoma Chicken Salad, it was delicious so I had to figure out how to make it at home. Following is the recipe I've come up with. It is my new favorite chicken salad. I'm going to start using the dressing to drizzle over green salads as well. My recommendation for the easiest way to make this is to cook the chicken in a slow cooker over night, toss it in an airtight container in the morning and refrigerate it, then by lunch time it will be cool enough to shred or chop and toss into the salad. I know this is going to be my new favorite dish for picnic lunches this summer. Just be sure after eating this chicken salad to smile real big... and check your teeth for poppy seeds =).
Note: some other good substitutions for the dried cranberries would be diced apples or grapes and another good nut option would be almonds or cashews, but I would recommend trying the recipe as written at least once. The ingredients listed are a perfect combination together. When served over some fresh rustic bread this sandwich is to die for!


Sonoma Chicken Salad Sandwiches
Yields 5-6 servings


Ingredients:
3 1/2 cups cooked, shredded chicken (about 2 lbs boneless skinless chicken breast halves)
1 cup diced celery (about 3 stalks)
2/3 cup chopped pecans
1/2 cup dried cranberries, such as Craisins, roughly chopped
2 Tbsp finely grated Parmesan cheese
Sliced bread, for serving (here is a great recipe) 


Dressing:
2/3 cup mayonnaise
1/4 cup apple juice
3 Tbsp honey
2 tsp apple cider vinegar
1 tsp prepared yellow mustard (optional)
1 Tbsp poppy seeds
1/2 tsp onion powder
Salt and freshly ground black pepper to taste


Directions: 
In a large mixing bowl toss together shredded chicken, celery, pecans, dried cranberries and Parmesan cheese, set aside. In a separate mixing bowl whisk together all ingredients listed for the dressing until well blended. Pour dressing mixture over chicken mixture and toss to evenly coat. Serve over sliced bread, croissants or rolls. Store in refrigerator.


Recipe Source: Cooking Classy

Selasa, 15 Mei 2012

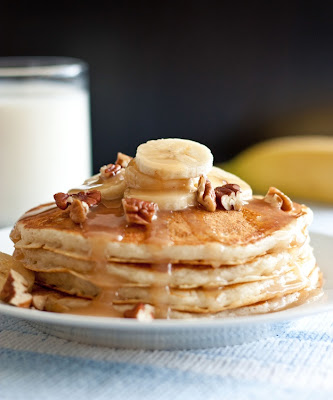
Banana Bread Pancakes with Cinnamon Cream Cheese Syrup


I admit it I'm pancake crazy =). I should start a food blog dedicated to pancakes. That's just how much I love pancakes. There are endless flavor possibilities and who doesn't love a warm fluffy pancake smothered in syrup to wake up to first thing in the morning? The great thing about this version is that they have all the flavors of banana bread but they are ready to eat in less than half the time. Plus you get this amazing Cinnamon Cream Cheese Syrup generously smothered over them which you don't get on banana bread. This pancake recipe will very likely keep you coming back for more. You can now have another use for the overripe bananas in your home, so move over banana bread you aren't the best thing for speckled bananas anymore. 


Banana Bread Pancakes
Yields about 1 dozen 

Ingredients:
1 1/2 cups all-purpose flour
2 Tbsp granulated sugar
2 tsp baking powder
1/2 tsp baking soda
1/4 tsp cinnamon
1/8 tsp nutmeg
1/4 tsp salt
1 cup buttermilk
1/4 cup + 2 Tbsp milk
1 cup mashed well, overripe bananas (about 2 bananas)
1/4 cup sour cream
1 egg
2 Tbsp butter, melted
banana slices, for garnish (optional)
chopped walnuts or pecans, for garnish (optional)

Directions:
Preheat a non-stick griddle to 325 degrees. In a mixing bowl, whisk together flour, sugar, baking powder, baking soda, cinnamon, nutmeg and salt, set aside. In a separate mixing bowl whisk together buttermilk, milk, mashed bananas, sour cream, egg and melted butter. Add dry ingredients to milk mixture and whisk just until combine (batter should be slightly lumpy, don't over-mix or your pancakes won't be as fluffy). Pour about 1/4 cup mixture onto buttered preheated griddle and using the measuring cup slightly spread the batter outward keeping a circular form (this helps them to be more even so you don't get the fat center and thin sides). Cook until bubbles begin to appear on the surface and bottom is golden, then flip pancake and cook opposite side until golden. Serve immediately with Cinnamon Cream Cheese Syrup and garnish with optional banana slices and chopped nuts.

Cinnamon Cream Cheese Syrup

Ingredients:
1/4 cup butter
3/4 cup granulated sugar
1/4 tsp cinnamon
1/3 cup buttermilk
4 oz cream cheese
1/2 tsp baking soda
1 tsp vanilla extract

Directions:
Melt butter in a large saucepan over medium low heat. Stir in sugar, cinnamon, buttermilk and cream cheese. Cook mixture, whisking constantly until cream cheese has melted. Stir in baking soda and whisk for about 10 seconds until very frothy. Remove from heat and stir in vanilla. Serve warm. Store in refrigerator up to 1 week. 
Note: leftover syrup is delicious over oatmeal, especially with a ripe banana mixed in.

Recipe Source: Cooking Classy


Senin, 14 Mei 2012

15 Minute Stove Top Mac and Cheese


Mac and cheese - comfort food at it's finest and with this recipe at it's fastest! I love how simple this recipe is. How could something so easy yield such rich, flavorful results? Who could ever make a box mix again after making it homemade? 
When creating this recipe I added a few unusual ingredients because I love adding just a bit more excitement to food. The liquid smoke flavor, Dijon mustard, onion powder and garlic powder blend in so well you hardly know they are there. They just enhance the dish, not overpower it. I love the combination of Cheddar and Monterrey Jack cheese, they are my two favorite cheeses so of course they had to be the two cheeses I used to make this recipe. They both melt so smoothly to create a perfectly silky, decadent macaroni and cheese. Enjoy!


15 Minute Stove Top Mac and Cheese
Yields about 4 servings


Ingredients:
8 oz. elbow macaroni noodles
3/4 cup milk (I'd recommend 1% or 2%, whole was too rich)
1 Tbsp butter
1/4 tsp onion powder
1/8 tsp garlic powder
6 drops hickory smoke flavor, such as Liquid Smoke
1/2 tsp Dijon mustard (or 1 tsp if you like more mustard flavor)
1/4 tsp salt, or to taste
2 large egg yolks
1/2 cup evaporated milk
4 oz. Medium or Sharp Cheddar cheese, grated
3 oz. Monterrey Jack cheese, grated
Freshly cracked black pepper or cayenne, for garnish (optional)


Directions:
Cook pasta according to directions listed on package until cooked through (just past al dente), and drain. 
Meanwhile (in order to make this a 15 minute recipe I made the sauce as the noodles were cooking), in a medium saucepan combine 1% milk, butter, onion powder, garlic powder, liquid smoke, Dijon mustard and salt then scald mixture over medium heat. In a mixing bowl, whisk together egg yolks with 1/2 cup evaporated milk. Add 1/4 cup scalded milk mixture to egg yolk mixture and whisk, then pour and whisk mixture into saucepan. Cook mixture over medium low heat, stirring constantly, until mixture coats the back of a wooden spoon, about 3 minutes. Add cheese and drained pasta to sauce mixture and gently toss mixture with a rubber spatula until cheese has melted. Serve immediately sprinkled with optional black pepper or cayenne pepper. 


Recipe Source: Cooking Classy

Kamis, 10 Mei 2012

Chewy Almond Poppy Seed Granola Bars (Lemon Poppy Seed variation too)


Time to ditch that almond poppy seed muffin your having every other morning for breakfast and reaching for this healthier, equally as delicious almond poppy seed granola bar instead! I'm ecstatic about this recipe that I came across from Rachel Ray. You can make a full batch of better tasting (and better for you) than store bought granola bars at home in about 5 minutes. I now have no excuse for buying the preservative filled granola bars at the store =), but after trying these I no longer have the desire to buy the store bought ones either. The possibilities with the recipe are endless! I can't wait for all the variations I'm going to try on these in the future. Here are some ideas ahead of time because I can't resist sharing =):

  • Chocolate chunks, freeze dried raspberries and chopped almonds
  • Dried apples, chopped, baking caramel pieces (I'd freeze them first then add to oat mixture or press into the top) and cinnamon/nutmeg
  • White chocolate chunks, dried cranberries and macadamia nuts
  • Lime zest/juice, coconut, coconut extract and chopped macadamia nuts
  • Toasted coconut, candied pineapple, chopped macadamia nuts and dried bananas 
  • Dried blueberries, chopped almonds, white chocolate chips and almond extract
  • White chocolate chips, orange zest and orange juice
  • Pretzels, peanut butter and chocolate chips
  • Peanuts, peanut butter and freeze dried raspberries (I love the flavors of a PBJ)

That's just a random list, I haven't tested them yet but they are combinations I can't wait to try in the future. If you try them let me know how you like them or let me know of any variations you come up with and love. Have a great day! 


Chewy Almond Poppy Seed Granola Bars
Yields 12 bars


Ingredients:

2 cups quick cooking oats
1 cup Rice Krispies Cereal
1/3 cup (heaping) dry roasted almonds, chopped
1 Tbsp poppy seeds
4 Tbsp butter
1/2 cup packed light-brown sugar
1/4 cup honey
1/8 tsp salt
3/4 tsp almond extract


Directions:
In a mixing bowl combine quick oats, Rice Krispies Cereal, chopped almonds and poppy seeds, set aside. Melt butter in a medium saucepan then stir in brown sugar, honey and salt. Bring mixture to a boil over medium high heat stirring constantly, then reduce temperature to medium low and simmer 2 minutes, stirring occasionally. Remove from heat, stir in almond extract. Pour sugar mixture over oat mixture and toss mixture until evenly coated. With buttered hands, firmly press mixture into a buttered 11 x 7 baking dish. Cover dish with plastic wrap and refrigerate 15 minutes. Cut granola into bars and store in an airtight container at room temperature.


Lemon Poppy Seed Variation


Ingredients:
2 1/4 cups quick cooking oats
1 cup Rice Krispies Cereal
1 Tbsp poppy seeds
4 Tbsp butter
1/2 cup light-brown sugar
1/4 cup honey
1 1/2 Tbsp fresh lemon juice
1 1/2 tsp lemon zest
1/8 tsp salt


Directions:
In a mixing bowl combine quick oats, Rice Krispies Cereal and poppy seeds, set aside. Melt butter in a medium saucepan then stir in brown sugar, honey, salt, lemon juice and lemon zest. Bring mixture to a boil over medium high heat stirring constantly, then reduce temperature to medium low and simmer 2 minutes, stirring occasionally. Pour sugar mixture over oat mixture and toss mixture until evenly coated. With buttered hands, firmly press mixture into a buttered 11 x 7 baking dish. Cover dish with plastic wrap and refrigerate 15 minutes. Cut granola into bars and store in an airtight container at room temperature.


Note: I also tested these with lemon extract and didn't like them as much. The lemon juice did make a softer bar vs. extract so be sure to press them in the pan firmly.


Recipe Source: Inspired by Rachel Ray


Rabu, 09 Mei 2012

Coconut Lime Ricotta Cookies


Meet a new and exciting, melt in your mouth cookie... Coconut Lime Ricotta Cookies! They are purely divine! To put them in words, just imagine an Italian cookie meets a refreshing tropical or Latin cake doughnut (that was my thought, my husband said they remind him of Alfajore cookies). 
If you want to be a good cook I firmly believe you have to be willing to take risks in the kitchen. It's about stepping out of your comfort zone and trying new things, mixing new flavors. One of my dreams and aspirations is to be a great cook (on the Food Network may I add =), so this recipe is the result of me trying something daring and exciting in the kitchen. I knew it would either be an utter failure or something spectacular. I'm proud to say they turned out to be the later, they are completely spectacular. Someone please tell me, how do I stop myself from eating five at once? The combination of flavors in this cookie may be one that you question with the Ricotta cheese combine with coconut and lime, I myself questioned it (before trying them) but you wouldn't believe how well all the flavors blend together! And don't worry, you don't really taste the Ricotta cheese.  It's not like this is a lasagna cookie. It just gives these cookies a wonderful texture. 
Never tried Ricotta cookies before? Then I must say this is the Ricotta cookie recipe you're going to want to try! 
If you're wondering what to do with the remaining 7.5 oz of Ricotta (if you bought a 15 oz container), double the batch of cookies or make half of a batch of Manicotti.


Coconut Lime Ricotta Cookies
Yields 2 1/4 dozen (25 cookies)


Directions:
2 1/2 cups all-purpose flour
3/4 tsp baking powder
1/4 tsp baking soda
1/2 tsp salt
1/2 cup butter softened
1 cup granulated sugar
1 large egg
7.5 oz Ricotta cheese, whole fat or low fat (this is 1/2 cup + 1/3 cup if you don't have a scale)
3 Tbsp coconut milk
1 tsp vanilla extract
1/2 tsp coconut extract
1 tsp lime zest
1 recipe Coconut Lime Glaze, recipe follows
1 cup toasted coconut (optional)


Directions:
Preheat oven to 350 degrees. In a mixing bowl whisk together flour, baking powder, baking soda and salt, set aside. In the bowl of an electric mixer, whip together butter and sugar until pale and fluffy, about 3-4 minutes. Stir in egg. Mix in Ricotta cheese, coconut milk, vanilla extract, coconut extract and lime zest. Slowly add in dry ingredients and mix until incorporated. Form dough into 2 Tbsp balls each and and drop onto Silpat or parchment paper lined cookie sheets. Bake 15 - 16 minutes. Remove from oven and allow to cool  several minutes before transferring to a wire rack to cool. Cool 30 minutes then spoon a heaping 1/2 teaspoon glaze over each cookie, use the back of the teaspoon to spread glaze over cookie. Before glaze begins to harden and set sprinkle with optional toasted coconut (garnish lightly with additional lime zest if desired). For a set glaze allow cookies to rest for about 1 1/2 - 2 hours, or for a sticky glaze enjoy immediately. Store cookies in an airtight container.


Coconut Lime Glaze


Ingredients:
1 1/2 Tbsp coconut milk
1 1/2 Tbsp fresh lime juice
1/2 tsp coconut extract
1 tsp lime zest
1 1/2 cups powdered sugar


Directions:
Combine all ingredients in a mixing bowl and whisk until well combine.


Recipe Source: Cooking Classy