Sabtu, 29 September 2012

Banana Bread Whoopie Pies with Fluffy Vanilla Bean Frosting


Have you ever tried banana bread in cookie form with a thick fluffy layer of frosting sandwiched between two of them? With these cookies now is your chance. They taste just like banana bread with an added bonus, a luscious layer of vanilla bean frosting. Lightly said, these cookies are amazing! I saw the Banana Whoopie Pies over at Martha Stewart and new I just had to try them. Lucky for me I keep a stock of overripe bananas in the freezer for emergencies such as this, where I need an overripe banana in it's prime but don't want to wait 7 more days for it to hit its peak ripeness. I used to question whether or not freezing bananas was a good idea until I tried if for myself a few months ago. It actually works great. You simply just leave them unpeeled and pop them into the freezer when they are nice and spotty. Then when you are ready to use them, thaw the frozen banana out (to room temperature, sometimes I cheat and even thaw them in the microwave) then peel and prepare them  as directed in your recipes. Their texture is different from that of an overripe banana that has not been frozen (I'm thinking of the word juicy, so be sure to add all those juices when prepping). They won't hold their shape well, but they are perfect for recipes that call for mashed bananas. Their color may not be the most pleasant, as the peel will blacken a bit when frozen, but this doesn't affect their flesh or taste so don't worry. 
I also wanted to mention to you that I finally found cheap vanilla beans! Where you are asking? My friend introduced me to this awesome website (indrivanilla.com) that sells them for 50 cents a piece! I seriously couldn't believe it! And they are pristine vanilla beans if you ask me. I was so excited when I got mine because they weren't completely dried, shriveled and lifeless. They just seemed so much fresher and even plumper than what I've gotten from the store (just FYI this isn't a sponsored statement of me trying to sell something for someone, I'm just so excited that I wanted so share the info about such a fabulous deal :). 
I made a few changes to the original cookie recipe. I didn't think 1/2 cup banana would give the cookies near enough banana flavor so I doubled it, then reduce the sour cream by half. I also decided to leave the vanilla out of the cookie portion because I wanted it all to come from the frosting so I could have an equal balance of banana and vanilla flavor. It is an entirely different frosting than what they had listed, but I think a cream cheese version would be delicious as well (although I'd use a lot more powdered sugar than they did, less cream cheese and add some butter of course =). Enjoy!


Banana Bread Whoopie Pies
Yields about 2 dozen 

Ingredients:
2 cups all-purpose flour
1/2 tsp baking powder
1/2 tsp baking soda
1/2 tsp salt
1 cup mashed overripe bananas (about 2 large)
1/4 cup sour cream
1/2 cup butter, softened 
1/2 cup granulated sugar
1/2 cup packed light-brown sugar
1 large egg
1 recipe Fluffy Vanilla Bean Frosting

Directions:
Preheat oven to 350 degrees. In a mixing bowl, whisk together flour, baking powder, baking soda and salt, set aside. In a separate mixing bowl, whisk together mashed banana and sour cream, set aside.
In a large mixing bowl, using an electric hand mixer on medium-high speed, whip together butter, granulated sugar and light-brown sugar until pale and fluffy, about 3-4 minutes. Blend in egg. Add banana mixture and mix until combine. Slowly add dry ingredients and mix just until combine. Scoop dough by rounded tablespoon fulls (about 1 1/2 Tbsp) and drop onto Silpat or parchment lined baking sheets placing them about 1 1/2 inches apart, then smooth edges and flatten cookie as needed (diameter of cookie should be about 1 1/2 - 2 inches. Alternately you can fill a pastry bag fitted with a 1/4 inch plain tip with batter, then pipe dough into 1 1/2 inch rounds onto baking sheet - if you do this method you may get more than 2 dozen pies). Bake in preheated oven for 12 - 13 minutes until edges are golden. Allow to cool 2 minutes on baking sheet then transfer to a wire rack to cool completely. Spread and sandwich a layer of frosting between two cookies. Store in an airtight container (in refrigerator if not serving within a few hours) .


Fluffy Vanilla Bean Frosting

Ingredients:
1 cup salted butter, at room temperature
seeds from two small vanilla beans 
4 cups powdered sugar
2 1/2 Tbsp milk
1 tsp vanilla extract

Directions:
In a large mixing bowl, using an electric hand mixer on medium high speed, whip butter and vanilla bean seeds until pale and fluffy, about 4 minutes. Add powdered sugar, milk and vanilla extract and blend 2 minutes until light and fluffy.

Recipe Source: cookie portion adapted slightly from Martha Stewart, frosting - Cooking Classy

Kamis, 27 September 2012

Copycat Samoa Girl Scout Cookies


Who doesn't love a Girl Scout Samoa Cookie? They are by far my favorite Girl Scout Cookie. This past spring I purchased eight cartons of the Dreyers Girl Scout Samoa Cookie Limited Edition Ice Cream and hoarded them away in my freezer. I thought they'd last much longer then they did. I can only wish I could buy the Samoas year round, but since I can't I've had to improvise. That is why I've come up with my own version of the Samoa Girl Scout Cookies. These things are amazing! Tender shortbread, sweet chewy caramel, perfectly toasted coconut and a nice chocolate coating to finish things off. YUM!
I won't lie to you, these cookies are quite a bit of work...but, they are well worth the effort. These cookies don't use real butter or fancy caramel, it's the cheap stuff just like what I'm quite certain they put in the real thing (it helps to read the ingredients list on the package when you are making up a copycat recipe =) . It's not often I use shortening and until now I've never used a cheap chocolate coating for anything, but for these I think it's a must.
I know some of you are going to ask, what is desiccated coconut and where do I get it? Desiccated coconut is shredded coconut that has been dried to remove as much moisture as possible. I used toasted desiccated coconut (I used this one here) in these because it looks exactly like whats in the Girl Scout ones. You can purchase it at a specialty kitchen needs stores or online.
I hope you love these cookies as much as I do! Enjoy!


Samoa Cookies
Yields just over 2 dozen (recipe can easily be doubled)

Ingredients:
3/4 cup + 2 Tbsp all-purpose flour
1 tsp cornstarch
1/4 tsp salt
1/8 tsp baking soda
1/2 cup all vegetable shortening
1/4 cup granulated sugar
1/2 tsp vanilla extract
1 1/2 Tbsp milk, as needed

3/4 cups toasted desiccated coconut, divided
22 caramels, unwrapped (such as Kraft)
2 1/2 Tbsp milk
1 pinch salt

1 recipe Chocolate Coating, recipe follows (or you could use melted chocolate chips, I'd recommend half milk chocolate and half semi-sweet)

Directions:
Preheat oven to 350 degrees. In a mixing bowl, whisk together flour, cornstarch, salt and baking soda, set aside. In the bowl of an electric stand mixer, fitted with paddle attachment, blend together shortening, sugar and vanilla until combine (only about 30 seconds). Stir in dry ingredients. Add milk 1/2 Tbsp at a time as needed, until dough comes together. Roll dough out between two large sheets of parchment paper, to about 1/6" thickness. Using a 2" cookie cutter, cut dough into circles then using the end of a small pastry tip cut a hole in the center of each circle. Using a large sharp knife or pastry scraper (floured as needed), slide knife under entire cookie and lift the cookie off of the parchment paper and transfer to a Silpat lined cookie sheet. Re-roll dough as needed until you've used it all. Bake cookies in preheated oven for about 10 minutes until lightly golden. Allow to cool 5 minutes on cookie sheet before transferring to a wire rack to cool.
Pour 1/2 cup desiccated coconut into a shallow bowl and set aside. Heat caramels, 2 1/2 Tbsp milk and a pinch of salt in a medium saucepan over medium heat, stirring constantly until melted and smooth. Reduce temperature to warm, add remaining 1/4 cup desiccated coconut to melted caramel and mix to combine. Leave caramel mixture over warm heat (as you coat cookies), stirring caramel occasionally. Working one cookie at a time, spread about 1 tsp caramel mixture around the top of cookie, then immediately dip caramel coated side of cookie into the bowl of desiccated coconut then set on parchment paper (or cooled cookie sheets) and allow caramel to set. 
Prepare chocolate coating according to directions listed then dip bottoms of cookies (none caramel coated side) in coating and run the bottom of the cookie along the inside edge of the bowl scrapping excess coating off (you just need a thin coating). Place dipped cookie upside down (so the chocolate coating should be facing upward). Repeat process with remaining cookies. Once coating on cookies has set, flip cookies to opposite side. Pour remaining chocolate coating (rewarm as needed first) into a Ziploc bag, seal bag and cut a very small tip off one edge of the bag then drizzle chocolate coating over cookies. Allow drizzled coating to set then store cookies in an airtight container.

Chocolate Coating

Ingredients:
5 Tbsp shortening
3 1/2 Tbsp cocoa powder
1/2 cup powdered sugar

Directions:
In a microwave safe bowl, using a fork, blend together shortening and cocoa powder. Microwave mixture in 15 second intervals on HIGH power, stirring after each interval until completely melted. Add powdered sugar and mix until well combine and smooth. Reheat as needed on 50% power for about 15 seconds, then stir.

Recipe Source: Cooking Classy

Selasa, 25 September 2012

Almond Poppy Seed Muffins


My two favorite muffins are blueberry muffins and almond poppy seed muffins. So a few weeks ago I set out to create an almond poppy seed muffin with the a fluffy muffin top, that had a combination of just the right amount of sweetness and almond flavor and a perfectly tender crumb. This was probably my fifth try but finally I did it =). The saying that baking is a science is definitely true. I tried different temperatures, different liquids and fats and different ratios. I'm definitely a self taught cook. Baking school could probably teach me a few things but I learn the hard way, through trial and error.
 These poppy seed muffins are like the ones you get at the bakery with the delicious golden muffin tops that hang over the sides. I used to frequently eat an almond poppy seed muffin from the bakery along with a chocolate milk for lunch (it made more of a brunch). I don't know why but I loved the two of them together. You will definitely want to eat these with a nice cold glass of milk, or almond milk (if you haven't tried almond milk yet you really should, the stuff is amazing). Enjoy!


Almond Poppy Seed Muffins
Yields 1 dozen

Ingredients:
1 3/4 cup all-purpose flour
3/4 tsp baking powder
1/4 tsp baking soda
1/4 tsp salt
2 Tbsp poppy seeds
1 cup granulated sugar
10 Tbsp butter, softened
1 large egg
1 large egg yolk
2 1/4 tsp almond extract
1/2 cup whole milk
1/2 cup sour cream
1/4 cup slivered almonds

Directions:
Preheat oven to 400 degrees. In a mixing bowl, whisk together flour, baking powder, baking soda, salt and poppy seeds, set aside. In the bowl of an electric stand mixer, attached with paddle attachment, blend together butter and sugar on medium speed until pale and fluffy. Add in egg, egg yolk and almond extract and mix until blended. Measure out milk into a liquid measuring cup then whisk sour cream into milk. Working in three separate batches beginning and ending with flour mixture, add flour mixture alternating with milk mixture to batter and mix on low speed just until combine after each addition. Divide batter among 12 paper lined muffin cups (in a non-stick muffin tin), sprinkle slivered almonds evenly among muffins and bake in preheated oven 16 - 18 minutes until lightly golden and toothpick inserted into the center comes out clean. Allow to cool and store in an airtight container.

Recipe Source: Cooking Classy


Slow Cooker Chicken Tortilla Soup


If you've been following I'm sure you know by now that I love a good slow cooker meal. Who doesn't? Meals prepared in a slow cooker yield flavorful and tender results with such minimal effort. This soup is definitely proof of that.
If you don't have a slow cooker you could also make this on the stove top. I've also prepared it on the stove top before and added grilled chicken to it. If you choose to prepare it on the stove top add cooked chicken and allow the soup an hour to simmer over low heat so all the flavors have some time to develop and meld together. 
I love Mexican food. I could eat it everyday. It has such unique and exciting flavors. Addictive flavors if you ask me. I hope you enjoy another Slow Cooker Meal from Cooking Classy =).

Slow Cooker Chicken Tortilla Soup
Yields about 5 servings

Ingredients:

20 oz boneless skinless, chicken breasts halves
3 (14.5 oz) cans low-sodium chicken broth
1 (14.5 oz) can diced tomatoes with green chilies
3/4 cup diced yellow onion (about 1 small)
1 Tbsp chili powder
1 tsp paprika
1 tsp ground cumin
3/4 tsp garlic powder
1/2 tsp ground coriander
1 Tbsp fresh lime juice
3 Tbsp chopped fresh cilantro 

Serve with:
diced fresh tomatoes
shredded Monterrey Jack or Cheddar Cheese (Mexican blend works too)
tortilla strips or tortilla chips, see recipe below for homemade baked tortilla strips
fresh guacamole or diced avocados
sour cream
hot sauce (optional)

Directions:
In a slow cooker, whisk together chicken broth, canned tomatoes, diced yellow onion, chili powder, paprika, cumin, garlic powder, coriander then season with salt and pepper to taste. Add raw chicken breasts, cover with lid and cook on low heat 7 - 8 hours. 
Remove chicken and shred. Return shredded chicken to slow cooker along with lime juice and fresh chopped cilantro and gently stir (if you wanted another filler you can add in some frozen corn or rinsed black beans). Serve warm with diced tomatoes, shredded cheese, tortilla strips, guacamole, sour cream, optional hot sauce and additional cilantro if desired.


Baked Tortilla Strips

Ingredients:
6 corn tortillas
olive oil cooking spray (vegetable works too)
salt

Directions:
Preheat oven to 400 degrees. Coat both sides of tortillas evenly with cooking spray. Align coated tortillas in an even stack, then cut in half down the middle, then dice halves into about 1/4" strips. Arrange strips in a single layer (if they overlap a little that's find just make sure they aren't stacked on top of each other) on a Silpat lined baking sheet, season with salt to taste and bake in preheated oven 10-12 minutes until golden. Allow to cool and store in an airtight container.

Recipes Source: Cooking Classy


Jumat, 21 September 2012

Ultimate Caramel Apples - A Favorite Fall Treat


I know I've already posted these caramel apples, but since I've been doing this food blog nearly a year I've learned a few tricks about food photography so I just wanted to share some new photos. Plus these are one of my favorite treats so I figured I may as well share them again for those of you that weren't following along last year to see them.
 I've made these caramel apples countless times and everyone always loves them. I mean who doesn't love a delicious, chewy, generously coated in caramel, chocolate covered, sprinkled with tasty toppings caramel apple? To take one bite is simply pure bliss. The chewy bite, the perfect texture and buttery stretch of the homemade caramel, ahhh. Words or pictures don't do them justice.
I like to make them pretty and fancy, but if you want you can just dip and coat the entire apple with caramel. I just love having that vibrant beautiful green show through though. The natural color of fruit is just gorgeous, so why hide it? This recipe is a bit time consuming but I'm telling you it is so worth it! Once you have these you wont want to let a Fall season go by without them. If you don't want to take the time to coat them with the chocolate and toppings then these really are amazing with caramel alone. The homemade caramel makes all the difference in a great caramel apple. It turns an ordinary caramel apple into a fancy, gourmet caramel apple. These make a great gift to give friends or loved ones. I just took them to friends and told them, Happy Fall! Who needs a holiday to celebrate =). I love Fall.
Also note that a candy thermometer is a MUST with this recipe. The caramel needs to be heated to exactly 239 degrees or it will either be too runny or too hard. If you don't have one it's worth the investment. You can pick one up at a local supermarket for about $10 - $15. I use mine all the time. Enjoy!


Caramel Apples
Yields 10

Ingredients:
10 small Granny Smith Apples
1 recipe Homemade Caramel, recipes follows
12 oz. milk chocolate or white chocolate chips*
Assorted toppings for coating, see list below
10 craft sticks or twigs

Directions:
Insert 1 craft stick vertically through the center of each apple, set apples aside. Butter two 13x9 pans, and make enough space in the refrigerator for them to sit evenly. 
Prepare Homemade Caramel as directed and allow to cool about 10 - 13 minutes then immediately dip apples in caramel (note: from my experience this caramel doesn't reheat well, so with that said you basically get one chance to dip so don't let the caramel cool too long and work quickly when dipping, you may even want to have a friend help to be able work quicker). If you want to make yours to look like the ones pictured (with the apple showing through the center on top) then tilt apple when dipping and don't fully immerse apple in the caramel, then carefully swirl the apple to coat all edges. Lift apple and let some of the excess caramel drip off and run the bottom of the apple along the inside edge of the pan. Tilt apple upside down and swirl just until the caramel is about to run off, then immediately turn upright and transfer to buttered baking dish in refrigerator. Repeat process with remaining apples, be sure to space them a bit apart on baking dish so they don't stick together. Allow caramel coated apples to set in refrigerator.
Heat chocolate chips in a microwave safe bowl on 50% power, in 30 second intervals stirring after each interval until melted and smooth. Using an icing spatula or butter knife, coat edges with melted chocolate and immediately sprinkle with desired toppings. Return to refrigerator to allow chocolate to set. Serve at room temperature and store in the refrigerator in airtight containers or Ziploc bags.

*Blocks of chocolate can also be used, just chop into small, uniform pieces to ensure even melting. Also, I highly recommend using quality chocolate (chips or blocks) such as Guittard, Ghirardelli or Godiva (any of the G's =). The lower quality chips don't melt as well and tend leave that dull residue when they set.

Homemade Caramel

Ingredients:
1 cup butter
2 cups granulated sugar
1 1/2 cups corn syrup
2 cups heavy cream
1 tsp vanilla extract

Directions:
In a large enameled cast iron pot, combine butter, sugar, corn syrup and 1 cup heavy cream. Heat mixture to a boil just over medium heat (the 6 of an electric stove), stirring frequently. Once mixture has reached a boil, stir in remaining one cup heavy cream. Then without stirring,(again just slightly over medium heat) bring mixture to exactly 239 degrees then immediately remove from heat (this should take around 20 - 25 minutes). Carefully pour caramel into a medium nonstick saucepan and stir in vanilla (transferring caramel to another pan helps it cool faster and will leave behind some of the little brown specs at the bottom of the cast iron pan. You don't have to transfer it but if you don't just allow the caramel to cool a little longer than the 10 minutes). Allow to cool 10 minutes before dipping apples.

Coating Ideas

To crush, place ingredients in a ziploc bag, seal and crush with a rolling pin. I probably make these too much because I've started naming them =). When I listed the white or milk chocolate chips I'm referring the which type of melted chocolate to coat them with.
  • Crushed Oreos with white chocolate chips - Cookies and Cream 
  • Crushed Oreos with milk chocolate chips - Cookie Fudge 
  • Crushed Butterfingers - Candy Bar Apple
  • Chopped nuts, such as pecans, almonds or peanuts - Nutty
  • Sliced or chopped almonds and poppy seeds with white chocolate - Almond Poppyseed 
  • Chopped dried cranberries & chopped walnuts or pecans with white chocolate chips - Christmas Apple
  • Sprinkles - Every Kids Favorite
  • Crushed graham crackers or graham cracker pie crust & a little cinnamon & nutmeg with white chocolate chips - Apple Pie
  • Crushed sugar cones or waffle cones with white chocolate chips - Ice Cream Apple
  • Chopped mini marshmallows & optional chopped nuts with milk chocolate chips - Rocky Road
  • Crushed pretzels - Salted Caramel
  • Crushed shortbread with milk chocolate chips - The Twix 
  • Crushed lavender & vanilla bean with white chocolate chips - The Gourmet
...or whatever else you can come up with.

Recipe Source: Caramel Apples - Cooking Classy, Homemade Caramel - adapted from allrecipes.com


Selasa, 18 September 2012

Old Fashioned Ultra Chewy Brownies with Chocolate Cream Cheese Frosting


We all have our favorite type of brownie. Some of us like them ooeey gooey, some of us like them chewy. Some like a more modern brownie that's ultra rich and nearly bittersweet, and some of us like them sweet and mild - more of a milk chocolate brownie. Well, chewy milk chocolate brownie lovers, this post if for you (I still don't quite understand  the semi-sweet chocolate craze. I don't like bittersweet, I like sweet. But who knows, maybe as I continue to age and my tastes change I will start to understand it more... or maybe I will always be more of a milk chocolate loving lady =)!
I like different brownies for different moods and cravings, but the majority of the time I like them chewy, not too gooey and not overpoweringly chocolaty. I think covering them with frosting is a nice splurge and a definite upgrade too.
I mentioned before I frequently visit a local bakery and I always get the same thing - their incredibly chewy brownie covered with chocolate cream cheese frosting. After far too many weekly (and sometimes biweekly) visits there, I finally decided I needed to recreate it at home. After several attempts I have finally done it! I'd say this recipe is an exact replica of that brownie that I adore. The first time I bought and tasted one, I remember thinking it was so different from other brownies, and they are. These brownies use a far less butter to flour ratio (than your average brownie), they have no baking chocolate in them just plain old cocoa powder, they use two types of sugar and they contain a little bit of milk. These will probably be the chewiest brownies you will ever eat! It's like a big, thick, cookie texture like brownie (you could even call them brownie cookie bars).
I decided to call these Old Fashioned Brownies for a few reasons. First, this is what I picture my Grandma making. Second, the bakery that inspired these has an old fashioned feel to  it. Lastly, I think the more modern trend of the brownie is dark chocolate, super rich and gooey and these are quite opposite of that, more classic and old fashioned. 
I hope you love these brownies as much as I do!


Old Fashioned Brownies with Chocolate Cream Cheese Frosting
Yields 12

Ingredients:
1 1/2 cups all-purpose flour
1/3 cup cocoa powder*
1/4 tsp baking powder
1/4 tsp salt
3/4 cup granulated sugar
3/4 cup packed light-brown sugar
1/2 cup butter, melted
2 large eggs
1 tsp vanilla extract
3 Tbsp milk 
1 recipe Chocolate Cream Cheese Frosting, recipe follows 

Directions:
Preheat oven to 350 degrees. In a mixing bowl, whisk together flour, cocoa powder, baking powder and salt, set aside. In a separate mixing bowl, using a wooden spoon, mix together granulated sugar, light-brown sugar and melted butter until combine. Stir in eggs and vanilla extract and mix until blended. Add in half of the flour mixture and mix just until combine, add in milk and mix just until combine, then add remaining flour mixture and mix just until combine (batter will be very thick). Pour batter into a buttered 8x8 baking dish and spread into an even layer. Bake in preheated oven 40 - 45 minutes until center is nearly set. Allow to cool completely then frost with Chocolate Cream Cheese Frosting and cut into squares (the frosting is a must for this recipe). Store in an airtight container.

*If you want a stronger chocolate flavor, you can use 1/2 cup cocoa powder instead of the 1/3 cup listed. I just wanted a more mild chocolate flavor for this brownie so I like 1/3 cup, but I have tested out both. If you do ad 1/2 cup cocoa then reduce the flour measurement by 2 1/2 Tbsp.

Chocolate Cream Cheese Frosting

Ingredients:
5 oz cream cheese, softened
3 Tbsp butter, softened
1/2 tsp vanilla
2 cups powdered sugar
1 1/2 Tbsp cocoa powder

Directions:
In a mixing bowl, using an electric hand mixer on medium speed, whip together cream cheese and butter until smooth and fluffy, about 1 minute. Add in vanilla and powdered sugar, then sift in cocoa powder and mix until smooth and fluffy, about 1 minute.

Recipe Source: Cooking Classy

Senin, 17 September 2012

Grilled Chicken Caprese Pasta


If you love Italian food then this is a deluxe meal you will most definitely want to try! It is fancy, loaded with fresh goodness, creamy, hearty and beyond good! You get everything that's on your average Caprese Chicken and so much more, with the tender pasta, fire roasted tomato sauce, additional garlic (because I think they never put enough garlic in the store bought bottled spaghetti sauce, you could even add two cloves to the recipe), and yes of course the perfectly grilled chicken breast strips. This is a meal you are going to remember. If you wanted to really splurge you could even add in some cooked Pancetta or Bacon, yum! Sorry I didn't get many pictures (I wanted more pictures with the grilled chicken showing through it's kind of hidden in there), this was my families Sunday dinner and I couldn't resist that ooey gooey cheesy goodness long. It was calling my name. I looked over to my husband and the cheese was dripping clear from the fork near his mouth to the plate sitting in his lap (yeah we ate this fancy meal on the couch, not usual but once in a while its fun =). Enjoy!


Grilled Chicken Caprese Pasta
Yields about 6 servings

Ingredients:
2 medium chicken breast halves, grilled and diced into strips*
9 oz Rigatoni or Penne pasta
2 cups fire roasted tomato pasta sauce (I used Classico)
1/2 cup heavy cream
1/3 cup finely grated Romano Cheese
1 clove garlic, finely minced
red pepper flakes, to taste (optional, for added heat)
Salt and freshly ground black pepper, to taste
1 pint grape tomatoes, diced into halves
12 oz fresh mozzarella, grated**
16 fresh Basil leaves, chopped chiffonade style (mine were fairly small)

Directions:
Preheat oven to 375 degrees. Cook pasta to al dente according to directions listed on package. While pasta is boiling, in a separate medium saucepan over medium low heat, heat tomato pasta sauce, heavy cream, Romano cheese, garlic, optional red pepper flakes and season with salt and pepper to taste. Cook, stirring frequently, until cheese melts. 
Drain cooked pasta well, return pasta to pot. Add in grilled diced chicken, grape tomatoes, half of the mozzarella and half of the basil ribbons, then pour warm sauce over mixture. Toss to evenly coat. Pour mixture into a greased casserole or baking dish. Sprinkle with remaining mozzarella and cook pasta uncovered for about 20 - 25 minutes until cheese is golden. Serve warm.

*This was about 1 lb chicken. I placed the chicken in a ziploc bag then pounded each breast to an even thickness, then removed and sprayed each chicken breast lightly with olive oil cooking spray. I seasoned each side with salt, pepper and a light sprinkle of garlic powder. Then grilled them until cooked through, cut them in half thick wise (like cutting a bun), and diced them into fairly thin strips.
**I've heard some people say they have trouble grating fresh mozzarella, I had no problem with this but if you do you can freeze it for 20 minutes prior to grating. They don't need to be perfect shreds its really just to break it up.

Recipe Source: adapted slightly from How Sweet It Is

Jumat, 14 September 2012

Pumpkin Pie Dip (A 5 Minute Recipe)


Some of you may be thinking, what is with this girl? Does she only eat pumpkin? I know I've posted a lot of pumpkin recipes lately, but it's just that time of year =). Also the other reason, I always buy the huge can of pumpkin puree because I can get it for the price of what the small can costs. So why would I buy the small can? It just wouldn't make sense. I hate wasting though, so I buy the large can and then I can get two, sometimes even three different pumpkin recipes out of it (unless of course I'm making pumpkin pie). 
I saw this Pumpkin Pie Dip floating around Pinterest so I thought, ooh yes I must try that! I liked that this recipe didn't use cool whip as some of the pumpkin pie dips do. I changed a few things from the original recipe. I thought it needed a little more pumpkin flavor so I added an additional 1/4 cup pumpkin puree (to the 1 cup listed).  I omitted the pumpkin pie spice and rather just increased the cinnamon, added nutmeg and cloves then left the ginger as listed, then I added a little caramel sauce of course. I love pumpkin and caramel. I love anything with caramel. 
This simple 5 minute dip is has just the right amount of sweet and spice, it's fluffy, creamy and yes even dreamy. Basically it's pure goodness. It tastes so much like pumpkin pie (different texture obviously, but same amazing flavor). So when you want a quick dessert with all the flavors of pumpkin pie that everyone will love, then this is definitely what you'll want to make. You'll quickly lose track of just how much you've actually eaten. Enjoy and Happy Fall!


Pumpkin Pie Dip
Yields about 4 cups

Ingredients:
8 oz cream cheese, softened
2 cups powdered sugar
1 1/4 cups canned pumpkin
1/2 cup sour cream
1 1/2 tsp cinnamon
1/2 tsp nutmeg
1/2 tsp ginger
1/4 tsp cloves (optional)
1/4 - 1/2 cup caramel sauce, store bought or homemade (optional, but highly recommended)
graham crackers, chocolate crackers or gingersnap cookies for servings

Directions:
In a large mixing bowl, using an electric hand mixer on low speed, blend together cream cheese and powdered sugar until combine, then increase mixer to medium and beat for 1 minute until smooth and fluffy. Add in pumpkin, sour cream, cinnamon, nutmeg, ginger and cloves and mix until well blended and fluffy, about 1 - 2 minutes. Drizzle with optional caramel sauce (and marble if desired), serve with crackers. Store in refrigerator in an airtight container.

Tip: for cleaner edges on your graham crackers, simply cut them along indentations with a sharp knife rather than breaking them into individual pieces.

Recipe Source: adapted from Taste of Home

Rabu, 12 September 2012

Mini Pumpkin Cupcakes with Cream Cheese Frosting


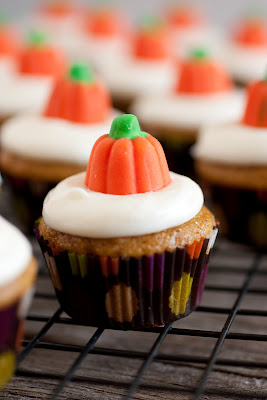
Wahoo! Time for the holidays... er... I mean next month, time for the holidays! My favorite time of year is the holidays. Why? All the food of course =)! That's why I'm getting way ahead of myself. I can't help it though, I saw these little candy pumpkins at the store the other day and thought, Oh I've just got to bake something with these. I bought a big bag then hid some up in the cupboard but somehow my family managed to sniff them out. I guess the baking cupboard is a given, everyone knows I've got a huge stash of goodies up there =). Luckily there were just enough left to make the perfect cupcake toppers for these delicious, bite size, Mini Pumpkin Cupcakes. 
For this recipe, I basically combined my Pumpkin Bars recipe with the cupcake portion of my Pumpkin Cupcakes with Chocolate Ganache and Spiced Cream Cheese Frosting (one of my favorite cupcakes). These cute mini cupcakes pack a lot of sweetness, moisture, flavor and pumpkin-y goodness into one little bite. They would be perfect for a Halloween party or for Thanksgiving of course. You can't have Thanksgiving without some kind of pumpkin dessert, right? Or you can make them and eat them for breakfast like my kids did, when they aren't frosted they are basically a fluffy pumpkin muffin so I figured why not =). 
Enjoy and share, because these are the perfect sharing size!


Mini Pumpkin Cupcakes
Yields about 3 1/2 dozen (I got 43) - recipe can easily be doubled

Ingredients:
1 cup all-purpose flour
1 tsp baking powder
1/2 tsp baking soda
1/4 tsp salt
1 tsp cinnamon
1/4 tsp nutmeg
1/4 tsp ginger
1/2 cup packed light-brown sugar
1/3 cup granulated sugar
1/3 cup butter, melted and whisked to cool slightly
1/3 cup applesauce, at room temperature
1 large egg
1 large egg yolk
1 tsp vanilla extract
3/4 cup + 2 Tbsp canned pumpkin puree
2 1/2 Tbsp buttermilk
1 recipe Cream Cheese Frosting, recipe follows
44 pumpkin candies, optional

Directions:
Preheat oven to 350 degrees. In a mixing bowl, whisk together flour, baking powder, baking soda, salt, cinnamon, nutmeg and ginger, set aside. In a separate large mixing bowl, using and electric hand mixer on low speed, blend together light-brown sugar, granulated sugar, butter and applesauce until well combine and smooth, about 1 minute. Mix in egg, egg yolk and vanilla. Add pumpkin puree and buttermilk and mix until well blended. Slowly add dry ingredients and mix just until combine. Fill paper lined mini muffin cups 2/3 full (about 1 slightly heaping Tbsp in each) and bake in preheated oven 12 - 14 minutes until toothpick inserted into the center of cupcake comes out clean. Allow to cool completely then frost with Cream Cheese Frosting and optionally top each cupcake with a pumpkin candy. Store in an airtight container.

Note: I would recommend serving these within an hour or two of topping them if you are adding the pumpkin candy because after that the frosting will begin to break the candy down. I would also recommend storing them in the refrigerator (if not enjoying within a few hours) in an airtight container and then let them rest at room temperature before serving.

Cream Cheese Frosting

Ingredients:
4 oz. cream cheese, softenend
1/4 cup butter, softened
2 cups powdered sugar
1/2 tsp vanilla extract

Directions:
Combine cream cheese and butter in a mixing bowl and using an electric hand mixer on medium speed, blend together until light and fluffy. Add in powdered sugar and vanilla and blend on low speed until combine, then increase to medium and whip until smooth and fluffy.

Recipe Source: Cooking Classy 

Selasa, 11 September 2012

Slow Cooker Pot Roast with Potatoes (A One Pot Hassle Free Meal)


There's nothing like a fall apart tender roast that's cooked low and slow along with some fresh veggies and a seasonings to highlight all of it's delicious flavors. This meal is one of the easiest meals you'll ever make. Yes there are countless ways to prepare a pot roast. You can be professional and brown the roast in some olive oil prior to slow cooking, as well as sauteing some sliced onions and freshly minced garlic. To me though, a slow cook meal is a hassle free meal. One that you can toss in and go. A busy day one pot meal. So, I created this recipe to be just that, no browning or sauteing required. The hardest part of this meal is dicing the potatoes, yes that's just how easy it is. Anyone can make this and everyone will utterly and completely enjoy it! Flavorful, unbelievably simple and amazingly delicious.
If you want you can throw it all in from the beginning (roast first then veggies on top), I just prefer that my veggies don't turn to mush. That's why I prepared it as listed but just do what works for you. Also, if you'd like you can also use red potatoes in place of the Russet potatoes. Enjoy!

Slow Cooker Pot Roast
Yields about 4 servings

Ingredients:
2 1/2 lbs chuck roast
1 1/4 cups beef broth
1 Tbsp + 1 tsp Worcestershire sauce
1 3/4 tsp dried Italian seasoning
2 tsp onion powder
1 tsp garlic powder
Salt and freshly ground black pepper, to taste
4 medium Russet potatoes, scrubbed and rinsed then diced into chunks about 3/4" - 1"
12 oz. baby carrots

Directions:
Place chuck roast in a slow cooker. Pour beef broth over roast, and drizzle with Worcestershire sauce. Sprinkle with Italian seasoning, onion powder, garlic powder then season with salt and pepper. Cover and cook on LOW heat 7 hours. 
Remove roast to a large plate or cutting board, reserving broth in slow cooker (it should be fall apart tender so it will likely break apart when you lift it out). Add diced potatoes and baby carrots to slow cooker in broth (the broth should cover the veggies), return roast to slow cooker placing on top of vegetables. Cover and cook on HIGH for 1 - 1 1/2 hours, or until vegetables are tender when pierced with a fork. Plate and ladle with broth in slow cooker.

Recipe Source: Cooking Classy

Senin, 10 September 2012

My Favorite Fluffy Buttercream Frosting


My sister came over a few days ago and wanted me to help her make a cake for her sons first birthday. Of course I love every opportunity I get to help someone bake and I feel pretty cool when they ask for my baking opinion =). She wanted to make a mini tiered cake (and I don't own the mini tiered cake pans so I had to get creative) and she wanted a delicious, white, fluffy frosting to cover it. She asked if we could get a really white frosting without the yellow tint. I told her the trick is in the technique. It's not just about the ingredients you put into the frosting, but also the method in which you prepare the frosting. In my opinion, these are the keys to a very light, fluffy, creamy, and amazingly delicious buttercream frosting:

1. Really whip the butter. I am talking until it's basically white. Really pay attention to the shade of the butter when whipping, making sure it becomes very very pale.
2. Use heavy cream. Cream makes everything better, and creamier of course.
3. Lots of butter. Yes there are days I try to be a little healthier and reduce the amount of butter I add to my buttercream frosting but those days I will admit, it's just not quite as good. This is an indulgent frosting and sometimes it's definitely worth it.
4. Ratio is important, don't add any more powdered sugar than listed or the proportions won't be right and your texture wont be what I call perfect.
5. Don't overdue it with the vanilla, add no more than 1 1/2 tsp. If anything reduce the amount. The beauty of the flavors of the buttercream comes from the butter. Basically it makes it taste like ice cream, it doesn't need to be enhanced, just lightly highlighted.
6. Whip it some more. Once you add the cream you still want more air and fluffiness in there. This isn't a one minute frosting recipe but I'm telling it's well worth the time and patience invested.

My sister and I both agree this is the best Buttercream Frosting, EVER! Don't forget the trick is in the technique. There are hundreds of buttercream frosting recipes out there, but the one that sets this apart from the others is preparation (and the use of salted butter). I hope you love this recipe! Now go make a batch of this luscious frosting and have cake today. Any day is a great day for cake =)! 


....And wait! Don't throw that frosting out! I frequently end up with a little frosting left over when I'm frosting cakes or cupcakes because I can't perfectly evenly divide it out. And no way am I going to throw good frosting down the drain! So, what to do with it (PS feel free to any additional ideas in a comment below)?

Ideas for leftover frosting:

  • sandwich between Nilla Waffers and roll edges in sprinkles for an easy treat the kids will love
  • spread over warm toast, add a pinch cinnamon if desired
  • spread over graham crackers, optionally sprinkle with chocolate chips
  • add a spoonful or two to your morning bowl of oatmeal (I tried a cream cheese in my banana oatmeal one morning, wow good)
  • use it as a dip for pretzels 
  • dunk teddy grahams or gingersnaps (its like homemade Dunkaroos)
  • spread over fruit, such as bananas or strawberries
  • melt chocolate frosting and pour over ice cream
  • add chopped nuts to it, chill and cut in squares
  • spread over warm pancakes or french toast
  • fold in some whipped cream or cool whip and use it as a fruit dip
  • add some caramel sauce and dip apple slices
  • turn it into a simple craft with the kids, tint it with food coloring, get out all the different varieties of sprinkles, icings and little candies you have in the cupboard and let them spread it of graham crackers and decorate as desired.
  • and of course last but not least simply place leftover frosting in an airtight container, store in refrigerator (up to 4 days) and enjoy throughout the next few days by the spoonful (if you don't want to temp yourself so much, freeze it for up to 3 months and thaw overnight in the refrigerator - never microwave to thaw).
Fluffy Vanilla Buttercream Frosting

Ingredients:
1 1/2 cups butter, at room temperature (3 sticks)*
4 1/2 cups powdered sugar
3 Tbsp heavy cream
1 1/2 tsp vanilla extract (use clear if desired)

Directions:
In the bowl of an electric stand mixer, using the paddle or whisk attachment whip butter on medium high speed (if using whisk attachment whip on high speed) until nearly white and very fluffy, about 7 - 8 minutes, frequently scrapping down the sides of the bowl. Add in powdered sugar, heavy cream and vanilla extract and mix on low speed until blended, then increase speed to medium and beat until very light and fluffy, about 5 - 6 minutes, frequently scraping down the sides of the bowl. Immediately spread over cooled cake or cupcakes. 

Note: if you want an alternate flavor of frosting, coconut or almond extract would be a great substitute for the vanilla extract, just add it to taste.

*I like to break the rules of baking =), I use salted butter. I like how the salt in the butter balances out the sweetness and I don't like to add in salt myself because I feel like it doesn't have a chance to dissolve well enough since it's not heated. If you prefer unsalted then feel free to use that instead, although I'd recommend adding at least one cube salted butter then two unsalted, try it out you may just love it.


Recipe Source: Cooking Classy


Make A Mini Cake Using Glass Storage Containers

If you were wondering how to make the mini tiered birthday cake, this is how I did it:
1. Line each a 1 cup, 2 cup and 4 cup oven safe, round glass storage container with aluminum foil, pressing and molding the foil directly to the insides of each container and leaving an slight overhang of foil on the sides (to lift out the cake), then spray the foil with non-stick cooking spray (or use a baster and baste with vegetable oil or melted butter) then dust with flour and shake off excess.
2. Preheat oven according to directions listed on cake mix box and prepare cake according to directions listed on package.
3. Fill foil lined cups 2/3 full (you may have just a bit of excess batter). 
4. Bake in preheated oven*(baking time will vary based on what type of cake mix you use, so judge accordingly), I made the confetti cake and it took about 25 - 30 minutes for the one cup, then an additional 5 minutes for the 2 cup, then another 5 minutes for the 4 cup (so you should be removing the smallest first, letting the medium bake a little longer and the largest bake the longest), insert a toothpick into the center of cakes to check for doneness.
5. Allow cakes to cool in glass bowls several minutes then remove to a wire rack to cool completely. Once cool run a knife evenly along the top (about 1/2 - 1 inch down) to make cake even and remove excess on top.
6. Turn cakes upside down and frost, frosting largest first, then medium and finishing with the smallest (note that frosting sets quickly so keep that in mind if adding sprinkles).
7. Celebrate and enjoy!

*I feel silly even putting this but don't cover cake with the plastic storage lid when baking (kind of a given but I just wanted to clarify, bake it uncovered you don't want that lid to melt =).